Pick Your Perfect Box

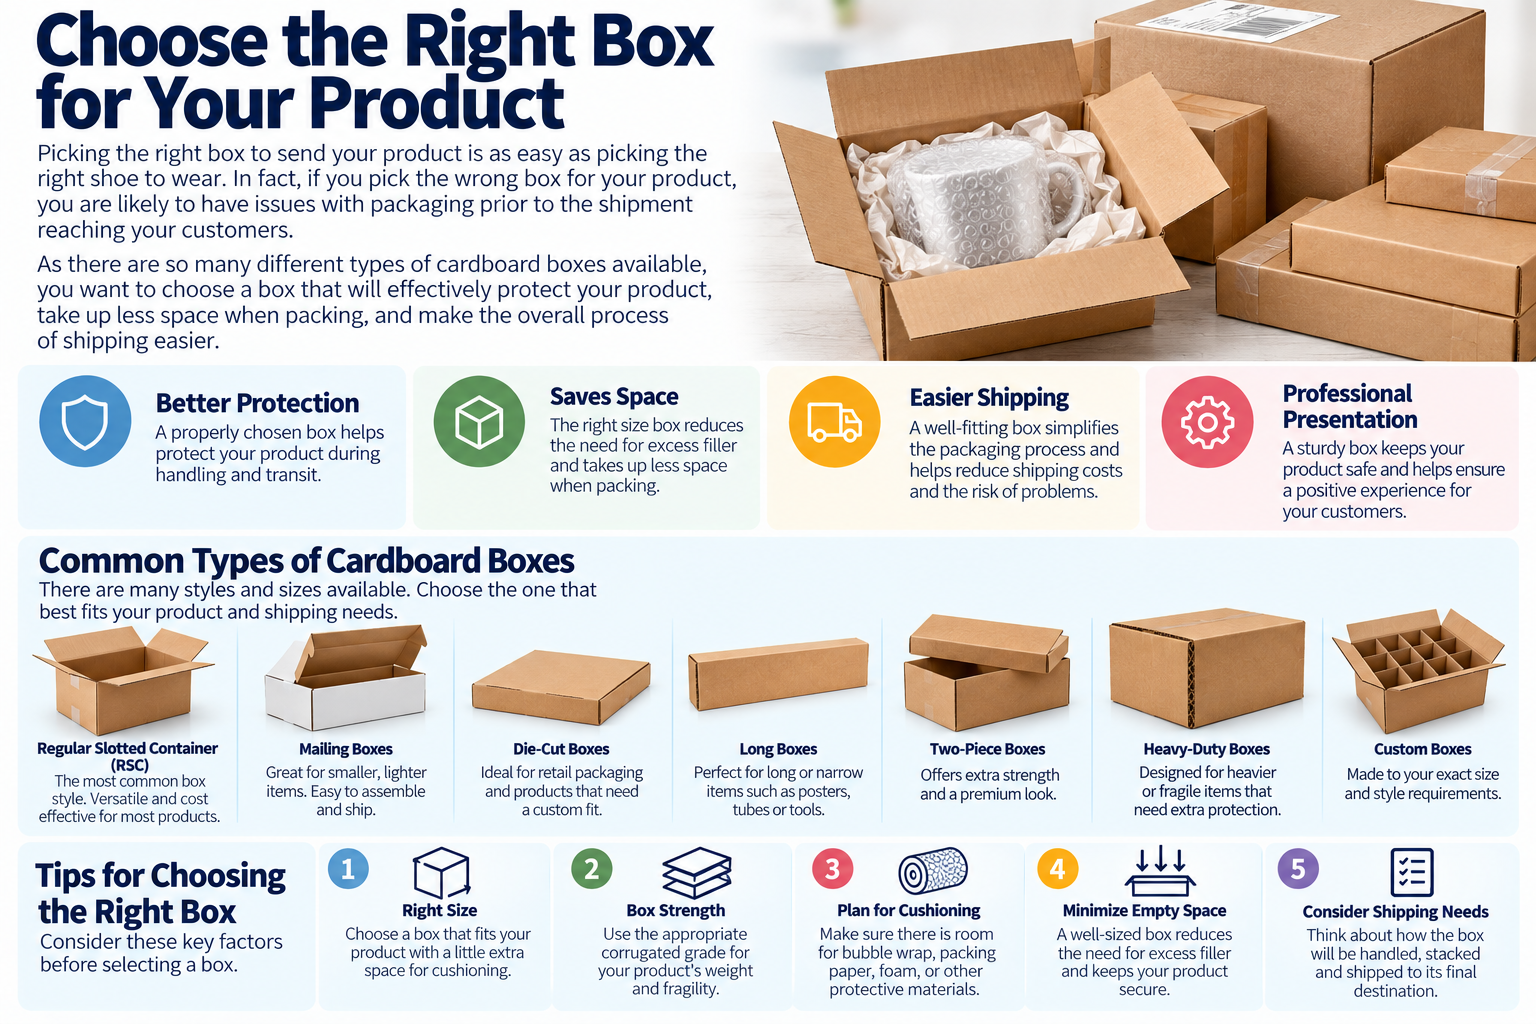
Picking the right box to send your product is as easy as picking the right shoe to wear. In fact, if you pick the wrong box for your product, you are likely to have issues with packaging prior to the shipment reaching your customers.

As there are so many different types of cardboard boxes available, you want to choose a box that will effectively protect your product, take up less space when packing, and make the overall process of shipping easier.

Choose The Right Size

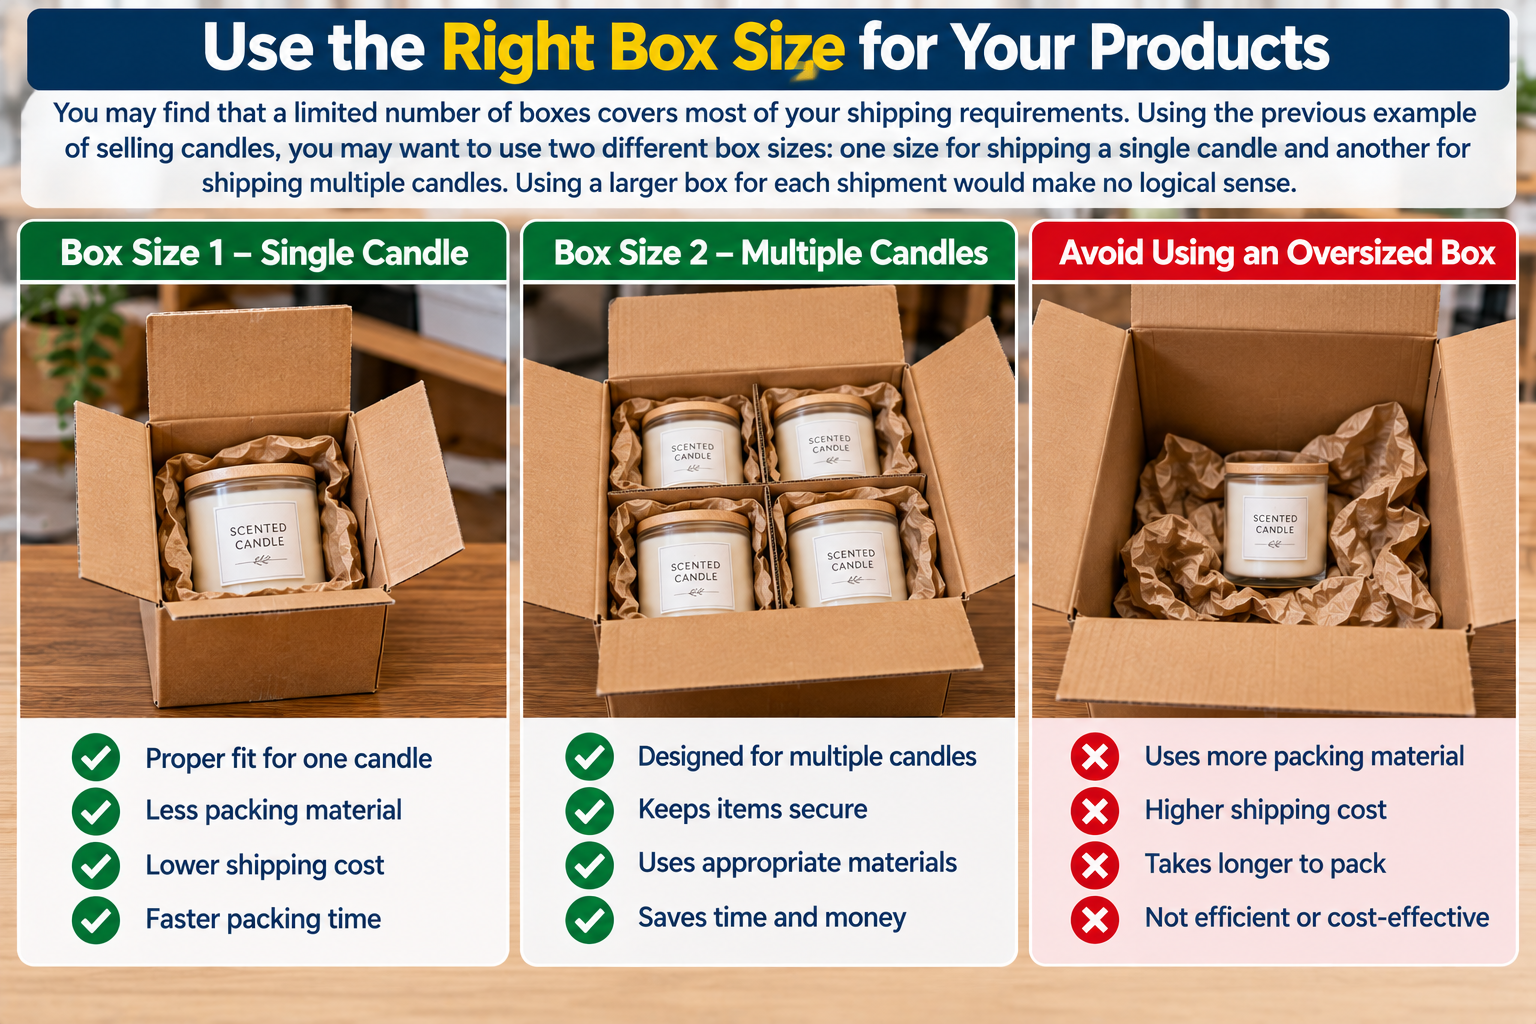
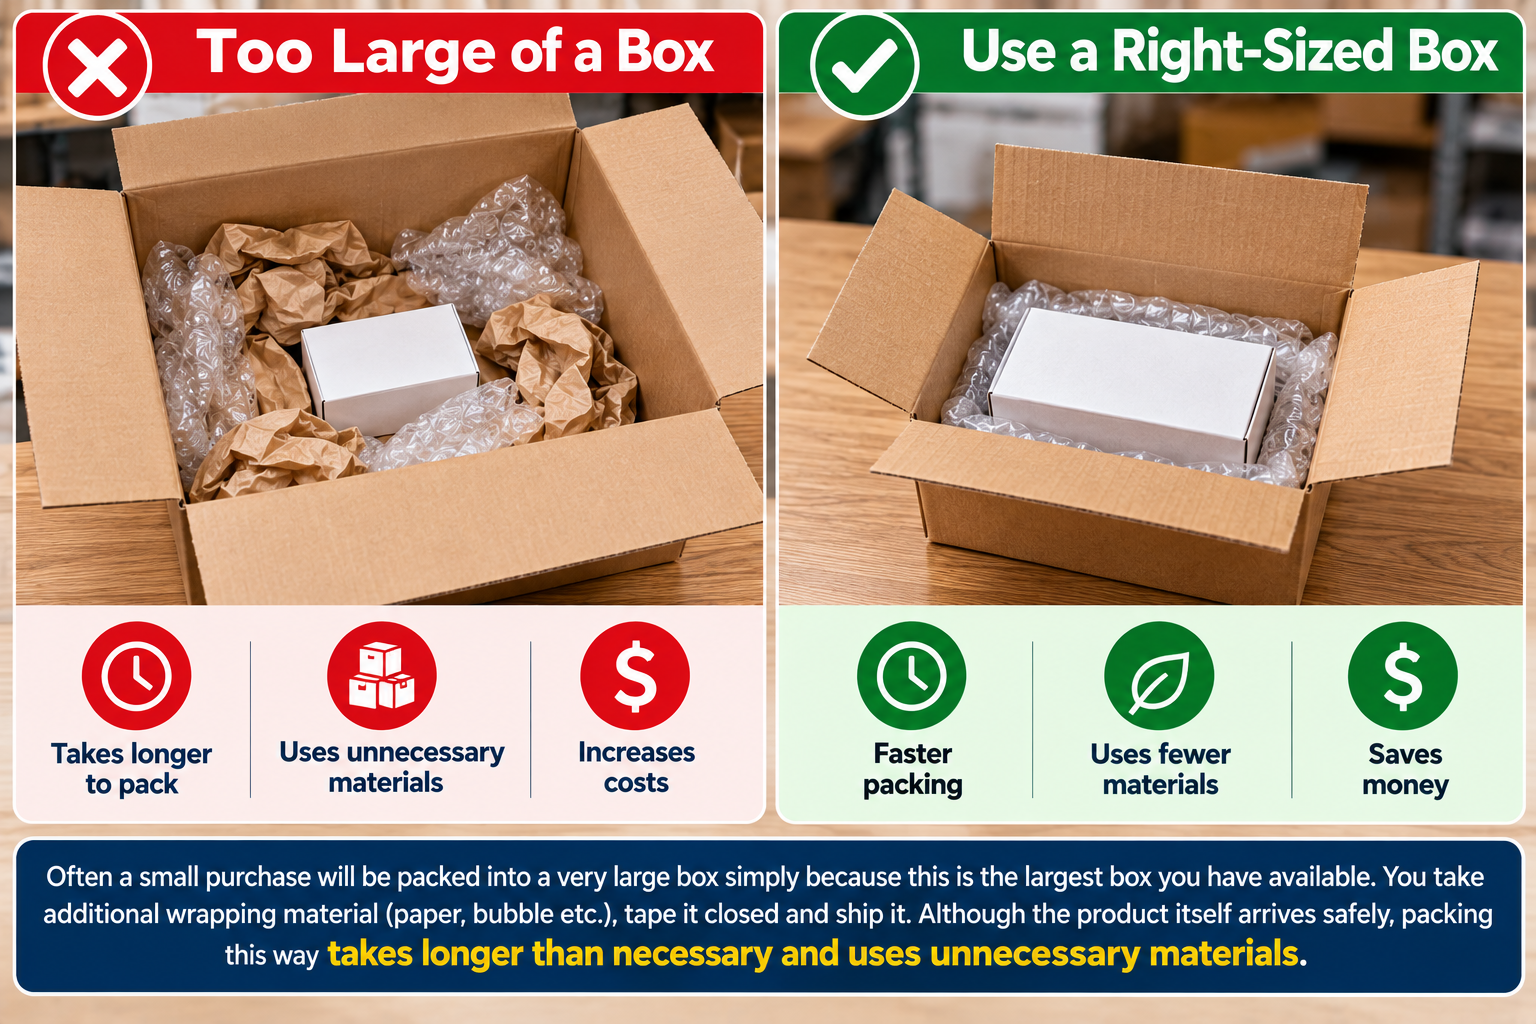
Just because a cardboard box is large doesn’t mean it’s the best choice. If the box is significantly larger than the product, you will have to use more bubble wrap, paper, etc. to completely fill all of the empty space. This can still allow the product to shift while being shipped.

Conversely, using a cardboard box that is too small for your product can create issues as well. When you force an object into a tight box, you increase the likelihood of creating damage to both the item and the sides of the box.

When selecting a cardboard box, you should look for one that allows sufficient room for your product and some additional padding (bubble wrap, paper, foam, etc.) without excessive amounts of unused space.

Consider Weight

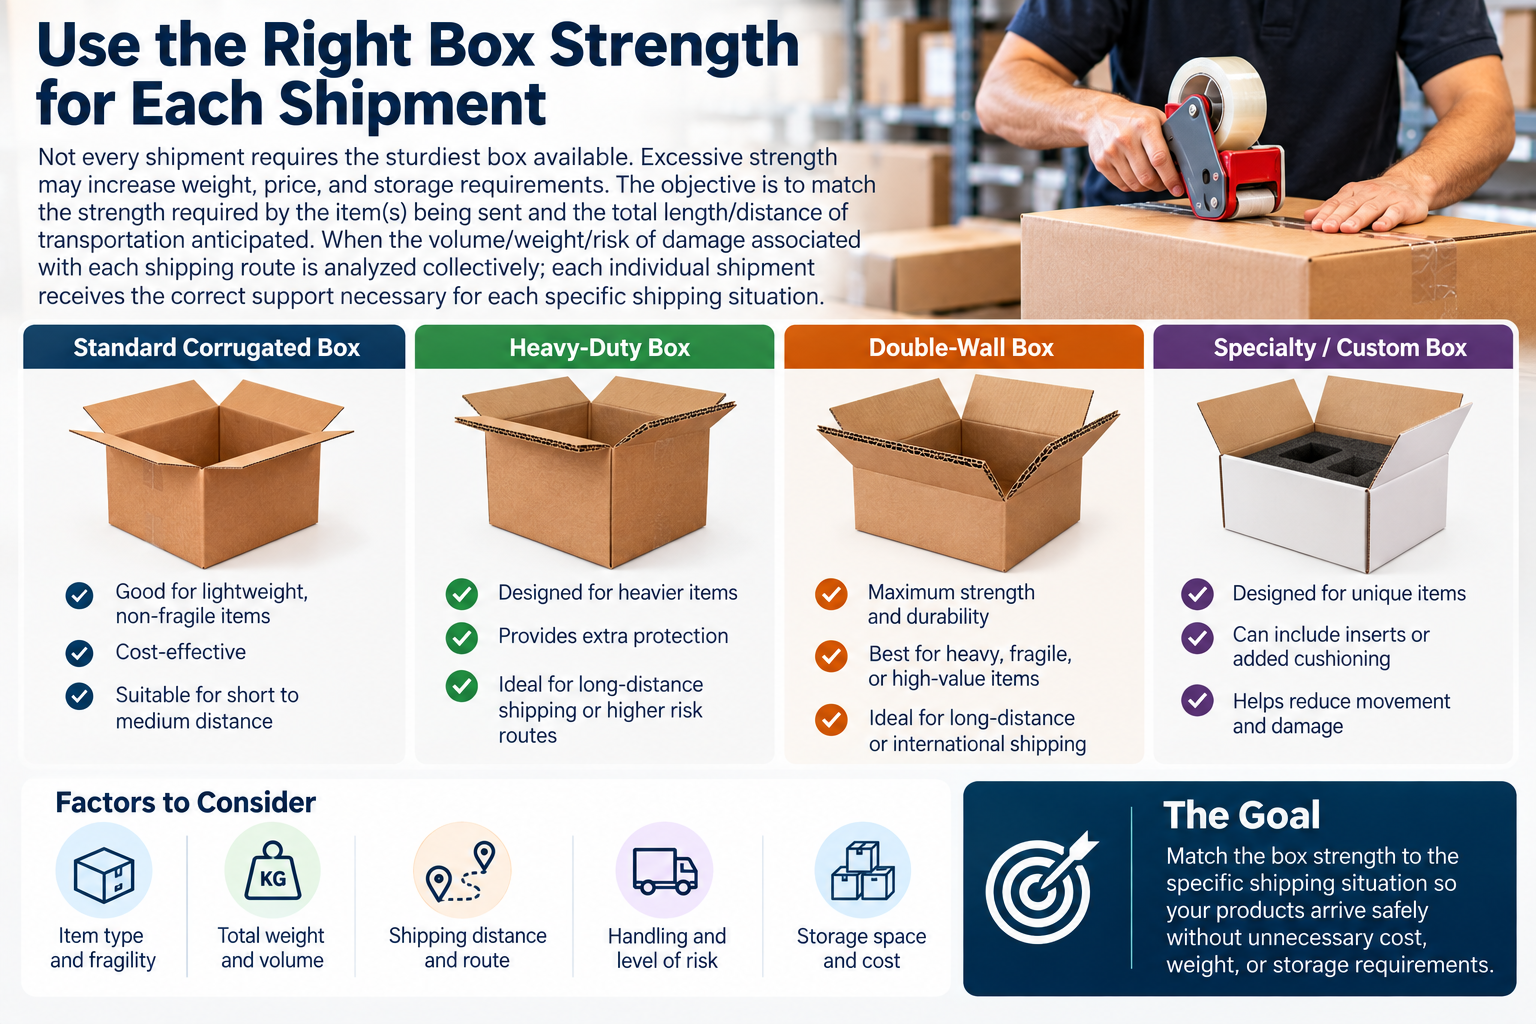
The size of the product is important when choosing a cardboard box; however, weight is equally as important. A light item may require no more than a standard corrugated cardboard box; whereas heavier items will probably require a stronger cardboard box designed to handle greater weights.

If you frequently ship heavy items, consider utilizing double-wall cardboard boxes. These offer even greater strength and protection against potential damage.

Consider The Journey

Your product may travel through numerous hands prior to reaching its destination. As such, the box itself must be able to withstand the rigors of being stacked in a truck, moved by conveyor belt systems, or having another package place atop it. Therefore, when choosing a cardboard box for your product, it is imperative that you select a sturdy enough box to survive the entire journey – from the time it leaves your desk until it reaches your customer.

Utilize Packing Materials Wisely

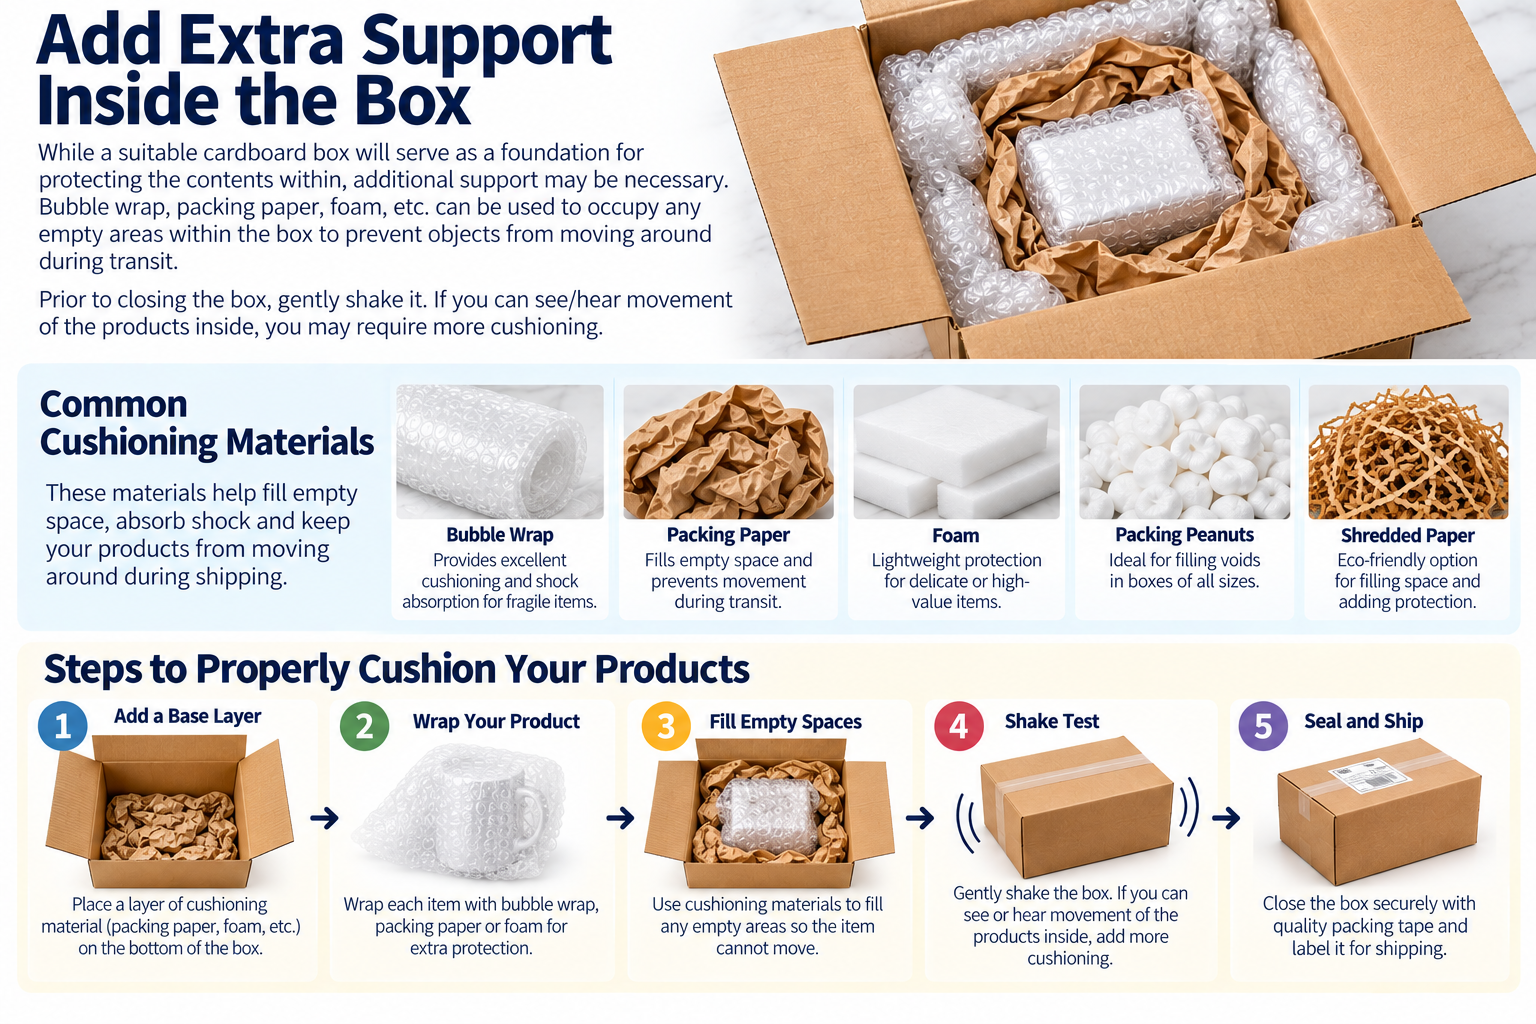
While a suitable cardboard box will serve as a foundation for protecting the contents within, additional support may be necessary. Bubble wrap, packing paper, foam, etc. can be used to occupy any empty areas within the box to prevent objects from moving around during transit.

Prior to closing the box, gently shake it. If you can see/hear movement of the products inside, you may require more cushioning.

Simplify The Packaging Process

Selecting the proper cardboard boxes can greatly simplify the packaging process while ensuring that products arrive at their destinations unscathed. To start this process begin by determining the dimensions/weight of your product. Consider what type of protection it requires as well as what potential dangers/products could encounter during shipping.

In most cases an ideal cardboard box will not need to be complex. An effective cardboard box should ideally meet three criteria:

* Be large enough for the product
* Provide adequate protection for the contents
* Survive the transportation route

Is this Box Going to Make it?

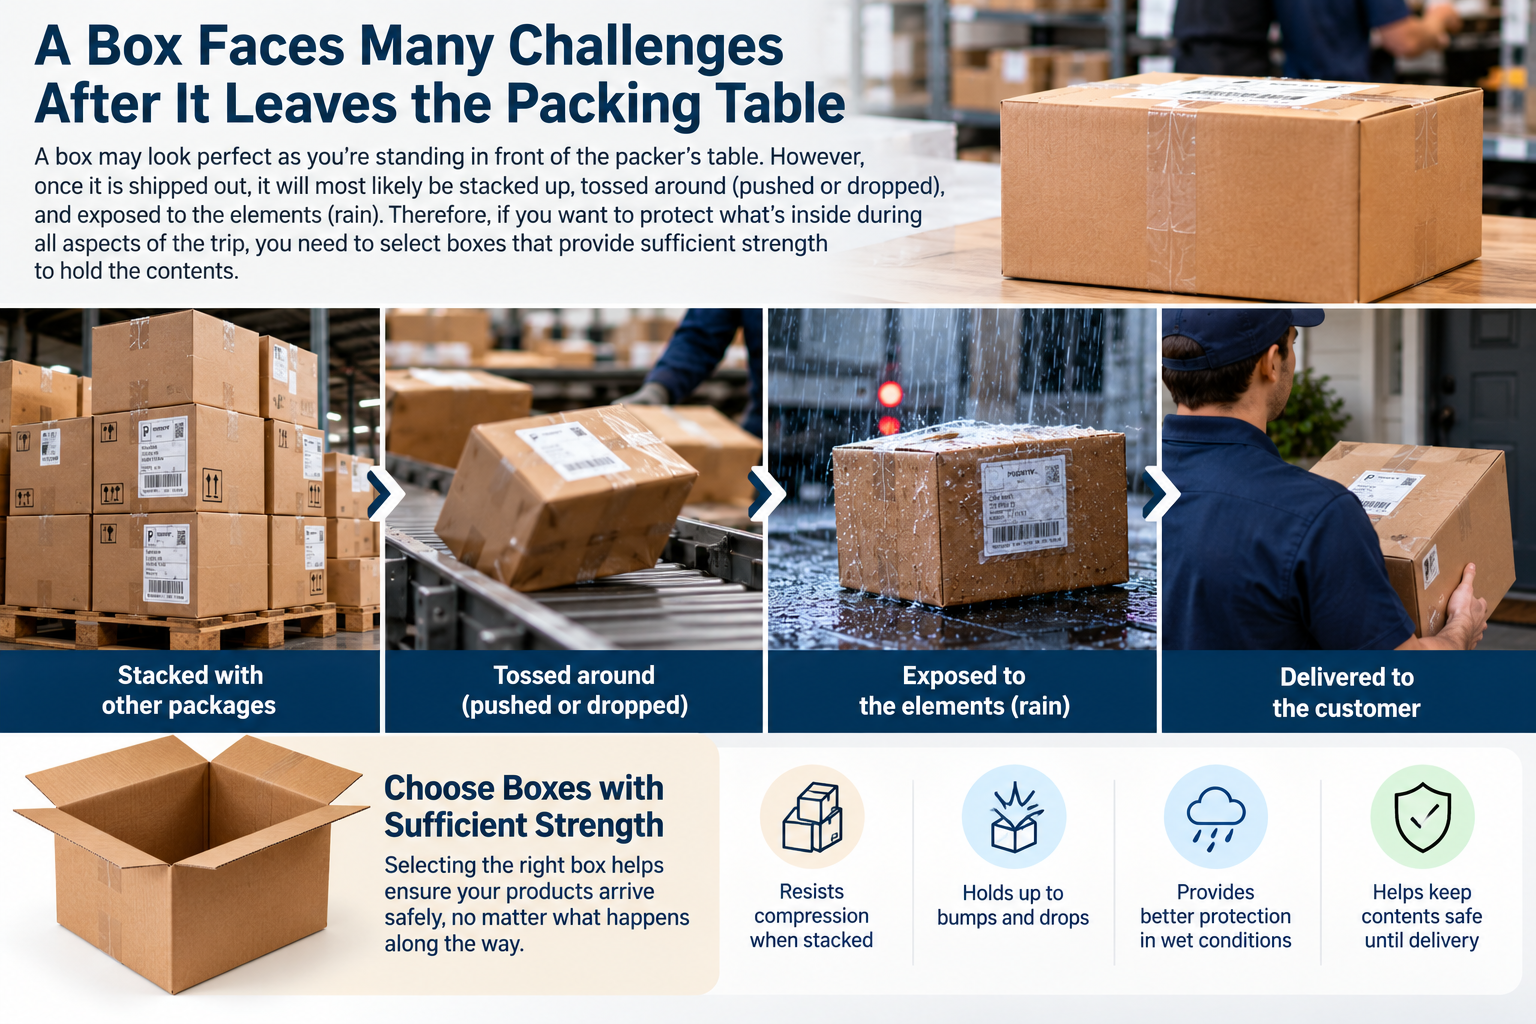
You could say that a box looks perfect as you’re standing in front of the packer’s table. However, once it is shipped out, it will most likely be stacked up, tossed around (pushed or dropped), and exposed to the elements (rain). Therefore, if you want to protect what’s inside during all aspects of the trip; you need to select boxes that provide sufficient strength to hold the contents.

The best way to do this is by assessing the weight of the entire shipment. Don’t evaluate the packaging based solely upon how well it looks while it is empty. Consider the item you are sending along with any additional items such as foam inserts, papers, and anything else that goes into the box. For example, an empty box that fits a lightweight shirt perfectly might not be suitable to support a set of heavy metal parts.

Next, inspect the bottom of the box prior to packing. Place the folded flaps over one another, then push them down firmly using your hand. In addition, they should remain flat and firm. However, if the bottom of the box is easily bent using minimal force, it is possible that it may collapse upon adding the item. Similarly, a weak bottom of the box could cause it to crack or open while lifting.

Inspect the sides of the box next. There are several types of packaging available including some that include a single layer of wavey corrugation between two outside panels, while others have multiple layers for extra protection. A single panel box may work for numerous lighter shipments; however, heavier items, fragile items, or items that are very valuable may require double panel packaging.

In addition to considering the type of packaging you select; consider where you intend to ship the package. Packages that are going to be transported locally within a city may experience fewer touches/handling issues compared to packages that are traveling long distances across the country. Long distance trips typically involve multiple truck stops, conveyor systems, and/or various sorting facilities. Each stop increases the number of potential points for impact/pressure.

Consider also, where you plan to stack the boxes. When carriers pick up your package and load it onto their vehicles; they will usually stack packages on top of one another. Press gently on top of an empty box to assess how sturdy the walls/corners are. If the walls collapse easily or the top “sinks” immediately; the box may not be able to withstand a significant amount of weight. Sturdy corners are essential to keeping the overall form of the box intact when stacked.

Finally, moisture is detrimental to cardboard packaging. Avoid purchasing/using boxes that appear wet/damp/soft/wavy. Store unused packaging materials in a dry location and avoid placing them near leaks (doors, pipes) so moisture does not accumulate under them. Although damaged cardboard packaging can sometimes recover after drying; once damage occurs to cardboard packaging; it will never regain 100% of its original strength.

Boxes that have been previously used must be thoroughly inspected. Check for signs of previous use such as; old creases, holes, crushed edges, or torn flaps. Remove any weak adhesive/tape and verify that the seams still align properly. Although a reusable box may be an economical option if it is firm; do not rely upon a used box simply because it has made it through one shipment.

When testing a new box; send one sample via mail or shipping carrier. Once sealed and packed; lift and move it throughout your workspace. On top of it, add another package (for a brief time) to simulate stacking conditions. Then remove the second package and examine both packages for any evidence of pressure/bending on either package. Testing a few samples initially will determine if a particular box design is ready for regular shipments.

Not every shipment requires the sturdiest box available. Excessive strength may increase weight, price, and storage requirements. The objective is to match the strength required by the item(s) being sent and the total length/distance of transportation anticipated. When the volume/weight/risk of damage associated with each shipping route is analyzed collectively; each individual shipment receives the correct support necessary for each specific shipping situation.

This Bag Is Never a Toy

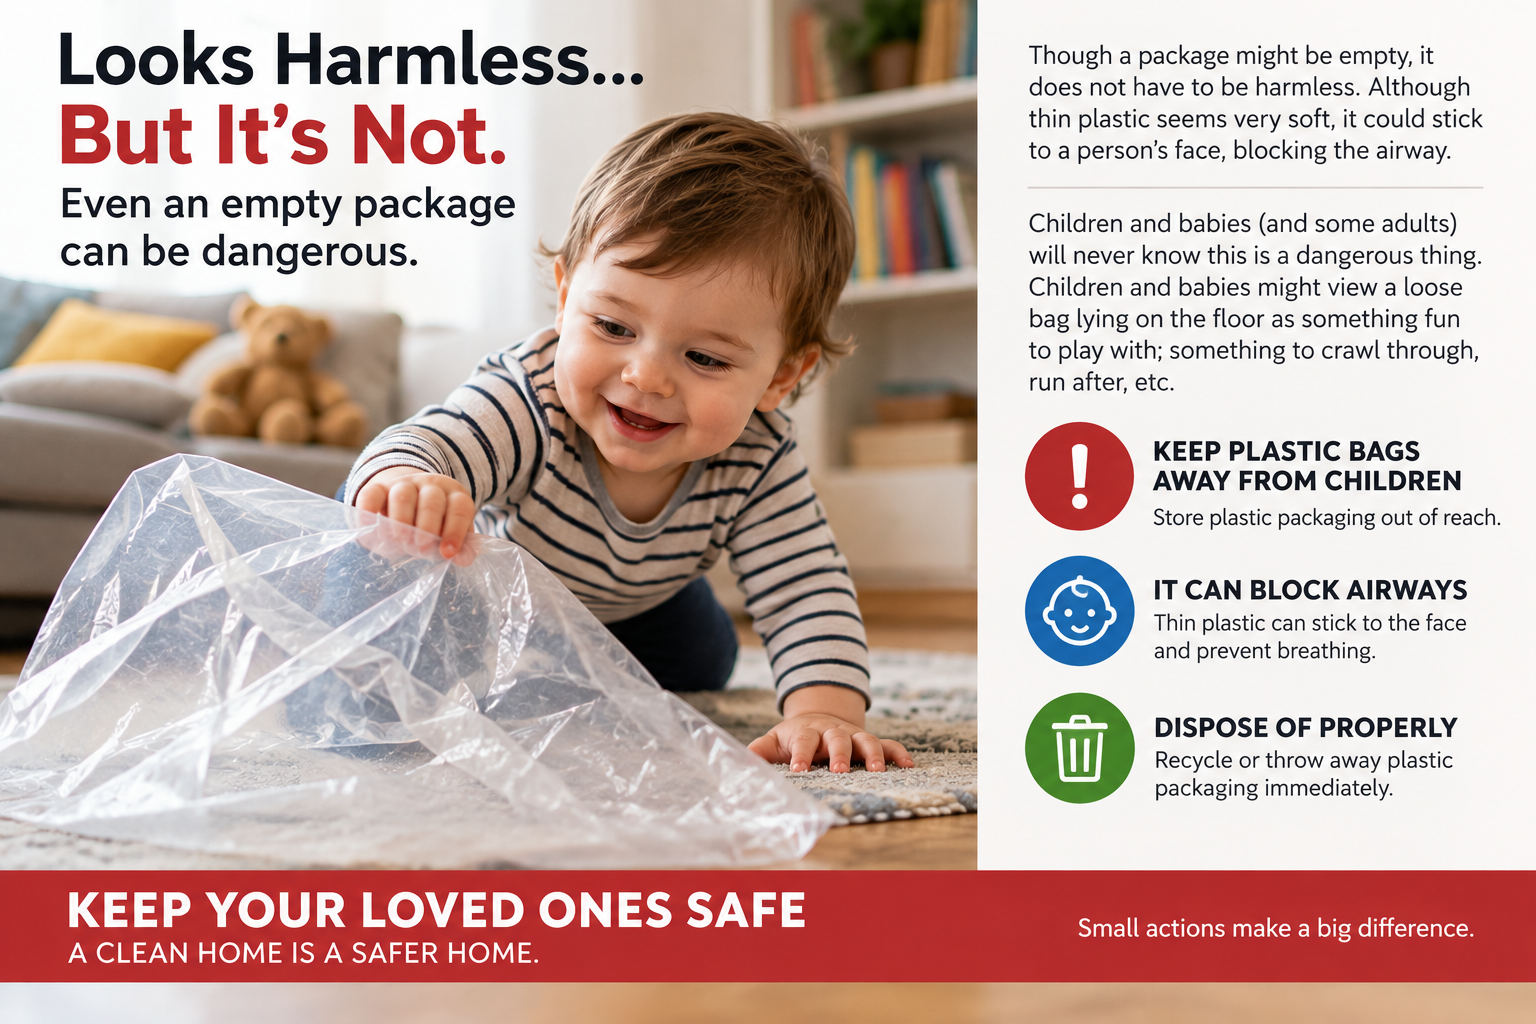
Though a package might be empty, it does not have to be harmless. Although thin plastic seems very soft, it could stick to a person’s face, blocking the airway. Children and babies (and some adults) will never know this is a dangerous thing. Children and babies might view a loose bag lying on the floor as something fun to play with; something to crawl through, run after, etc.

Safety starts BEFORE you start packing your items. Packaging materials need to be stored in a location that is inaccessible to children. Though a shelf might appear to be safe, a bag that hangs may come down by itself, or someone might pull it off the shelf. It is best to store these supplies in a location far from areas where food is prepared/served, pet beds/areas, and crib/baby sleeping areas.

Do not get more poly bags than are necessary for what you are doing. A worker who lays out 50-60 bags across a table may get confused about how many he has laid out, and lose track of one that has slipped onto the floor. Take only the amount you need from the box. When the job is complete put all unused poly bags back into the container.

At the end of each working session you should search under tables, pallets/cartons, shelving units, etc. for lost or misplaced parts.

When using bags that contain a warning (i.e., “Keep Away from Children”) make sure the warning words can easily be read. Do not put warning words behind any type of sticker/adhesive label, or fold an edge of the bag to hide them. If a bag is large enough to completely enclose a baby’s head, the company must research the local laws/rules and/or store regulations regarding the use of such bags. Each state/store may have different rules/laws.

In addition to labeling and storing, there needs to be a method for consumers to safely deal with products once opened. A simple note asking consumers to please keep the bag away from children/pets would suffice. Make sure to write this note in a prominent location so that consumers will see it prior to removing the contents of the bag. Write simply and clearly. Consumers should not have to dig through pages of text looking for the safety information.

Pets too, can become injured when they smell food coming from an open bag. Dogs/Cats may try to get closer to the bag by sticking their noses into openings and then breathe into it tightly closing around their faces. All empty snack bags, food pouches, and product bags should be cut open along one side (not torn apart) before placing them in an enclosed garbage bin.

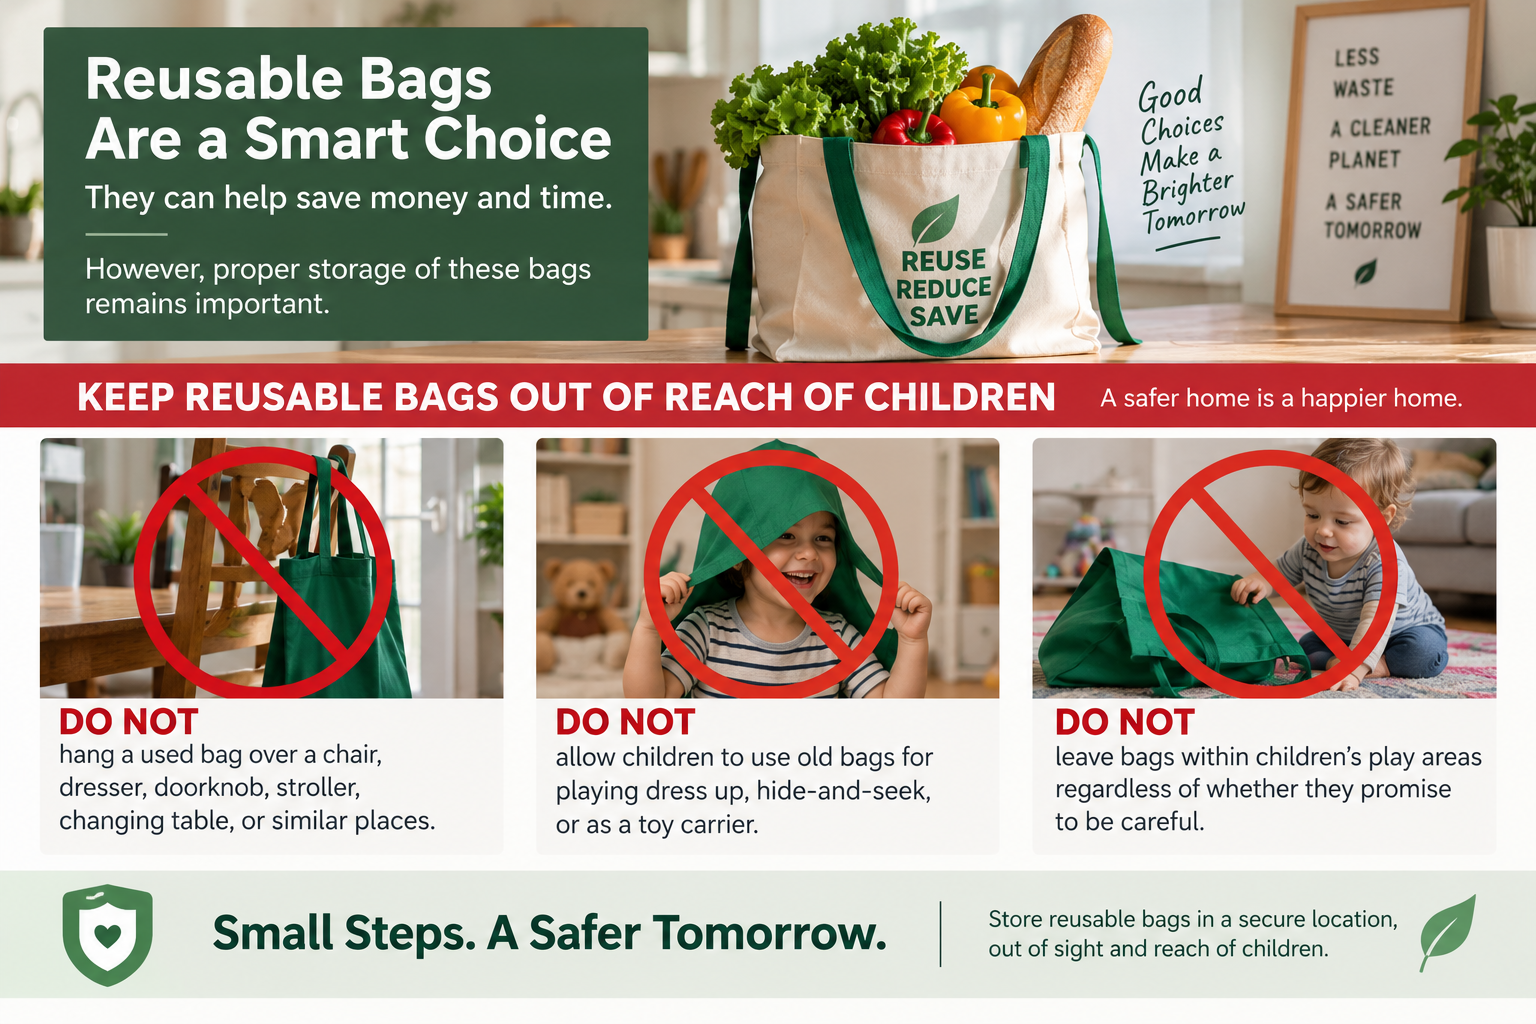
Using a reusable bag can help save money and time, however proper storage of these bags remains important. DO NOT hang a used bag over a chair/dresser/doorknob/stroller/changing table. DO NOT allow children to use old bags for playing dress up, hide-and-seek, or as a toy carrier. Remove the bag from children’s play areas regardless of whether they promise to be careful.

Regularly practicing good habits helps to ensure accidents don’t happen. Use control methods on your packaging materials, display warnings prominently (on the outside), clean up your workspace immediately after completing your tasks, and dispose of packaging materials immediately upon completion.

Reusable packaging bags provide us with several benefits for our businesses, but they are NEVER intended to be toys. Once their job is completed, disposing of them properly is part of that job!

Does That Brim Travel Bent?

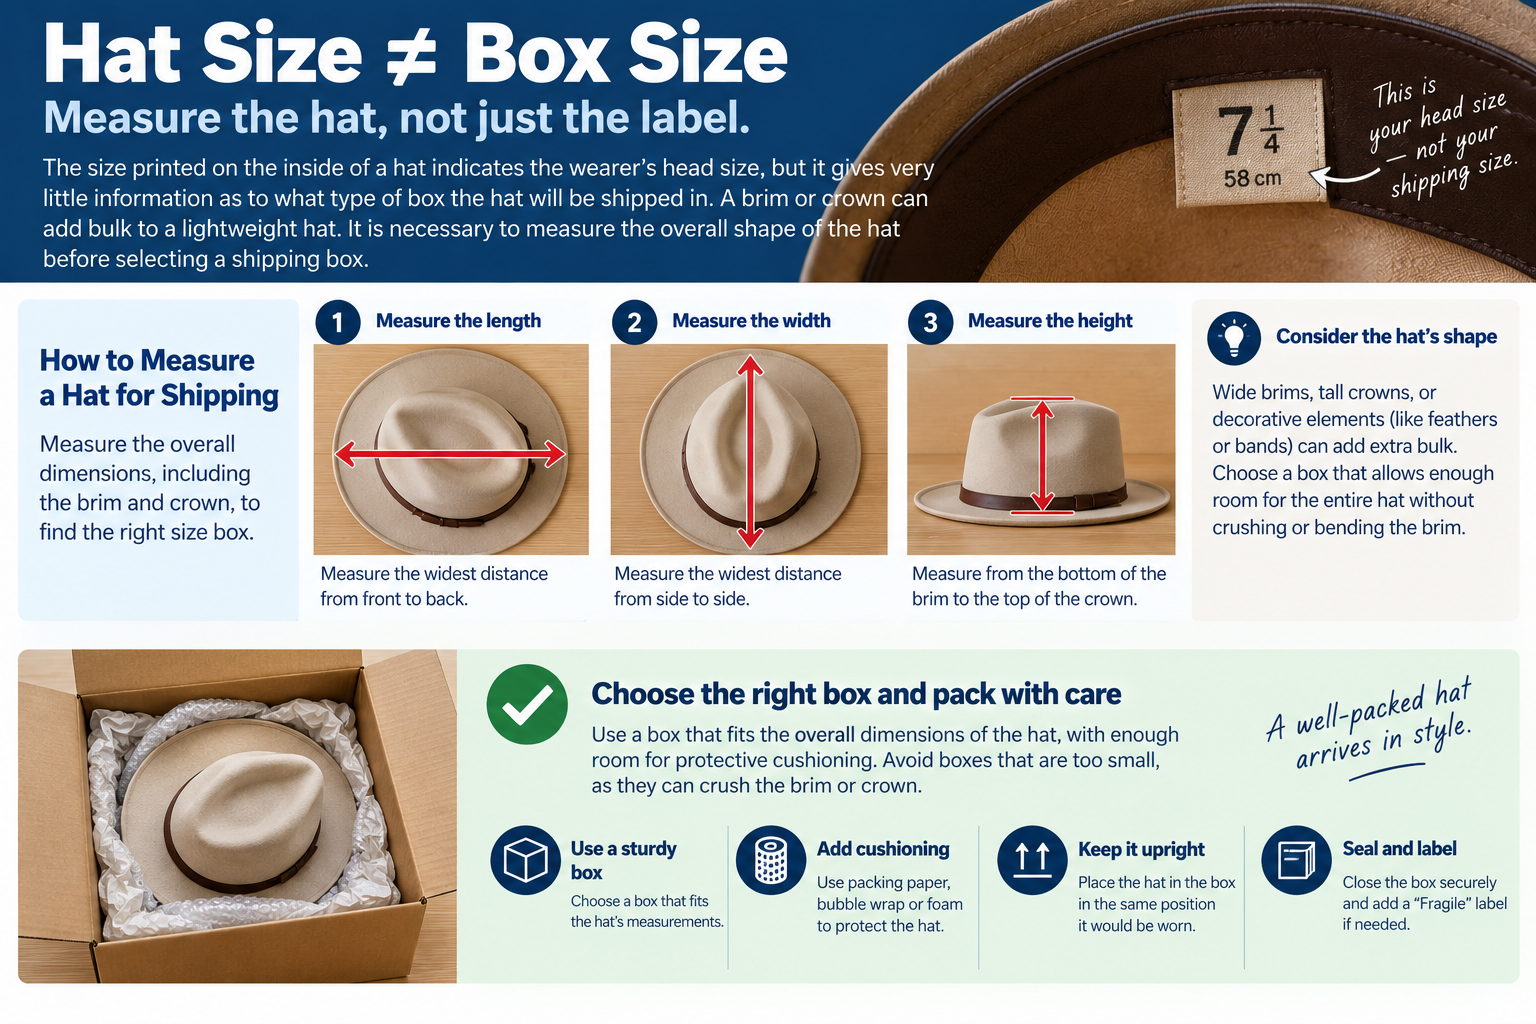
The size that is printed on the inside of a hat indicates the wearer’s head size, however it gives very little information as to what type of box the hat will be shipped in. A brim or crown can add bulk to a lightweight hat. It is necessary to measure the overall shape of the hat before selecting a shipping box.

Place the hat down according to the instructions provided by the manufacturer and record measurements of the widest dimensions including any additional length caused by a bow, feather, or other decorative elements extending past the basic shape. Add enough room for any support material needed to maintain the desired configuration during packaging. If the sides of the box are touching both edges of the brim, there is no extra room to protect these areas from damage, regardless of whether the top appears closed.

Consider which components of the hat may flex and which must retain their original shape. For example, a soft cloth hat may provide adequate protection using methods that could cause damage to a stiff felt hat. Never fold the brim or push down the crown unless the manufacturer has indicated this is acceptable.

When selling different types of hats, develop individualized packing documentation for each model so that helpers will not automatically follow procedures developed for previous models.

The interior supports within the cartons should be designed to complement the shape of the hat rather than alter it. Some styles require tissue to aid in filling them softly, whereas other designs require specialized holders to prevent distortion. Consult with both the hat designer/packer or materials supplier regarding placement of weight on the hat. Adding stuffing paper to all gaps will add unwanted force particularly near curved brims and/or delicate trim.

Test your entire assembly prior to ordering packing boxes. Slowly lower the lid and inspect for contact with the hat’s crown. Determine whether the internal support remains stable when lifting the box and if it does not shake excessively when dropped. While this process can identify some obvious issues with fit, an extremely valuable or fragile hat may benefit from consulting with an experienced professional in assessing the design requirements for safe transit.

If you send a hat with a storage container included, evaluate whether the container was intended to be used alone for shipment. A circular-shaped case requires a sturdier exterior carton with sufficient cushioning surrounding it. Place care cards and spares (band) near to where they can easily be found by the customer without disturbing any trim. Avoid having anything free hanging resting directly atop the hat simply due to available space under the lid.

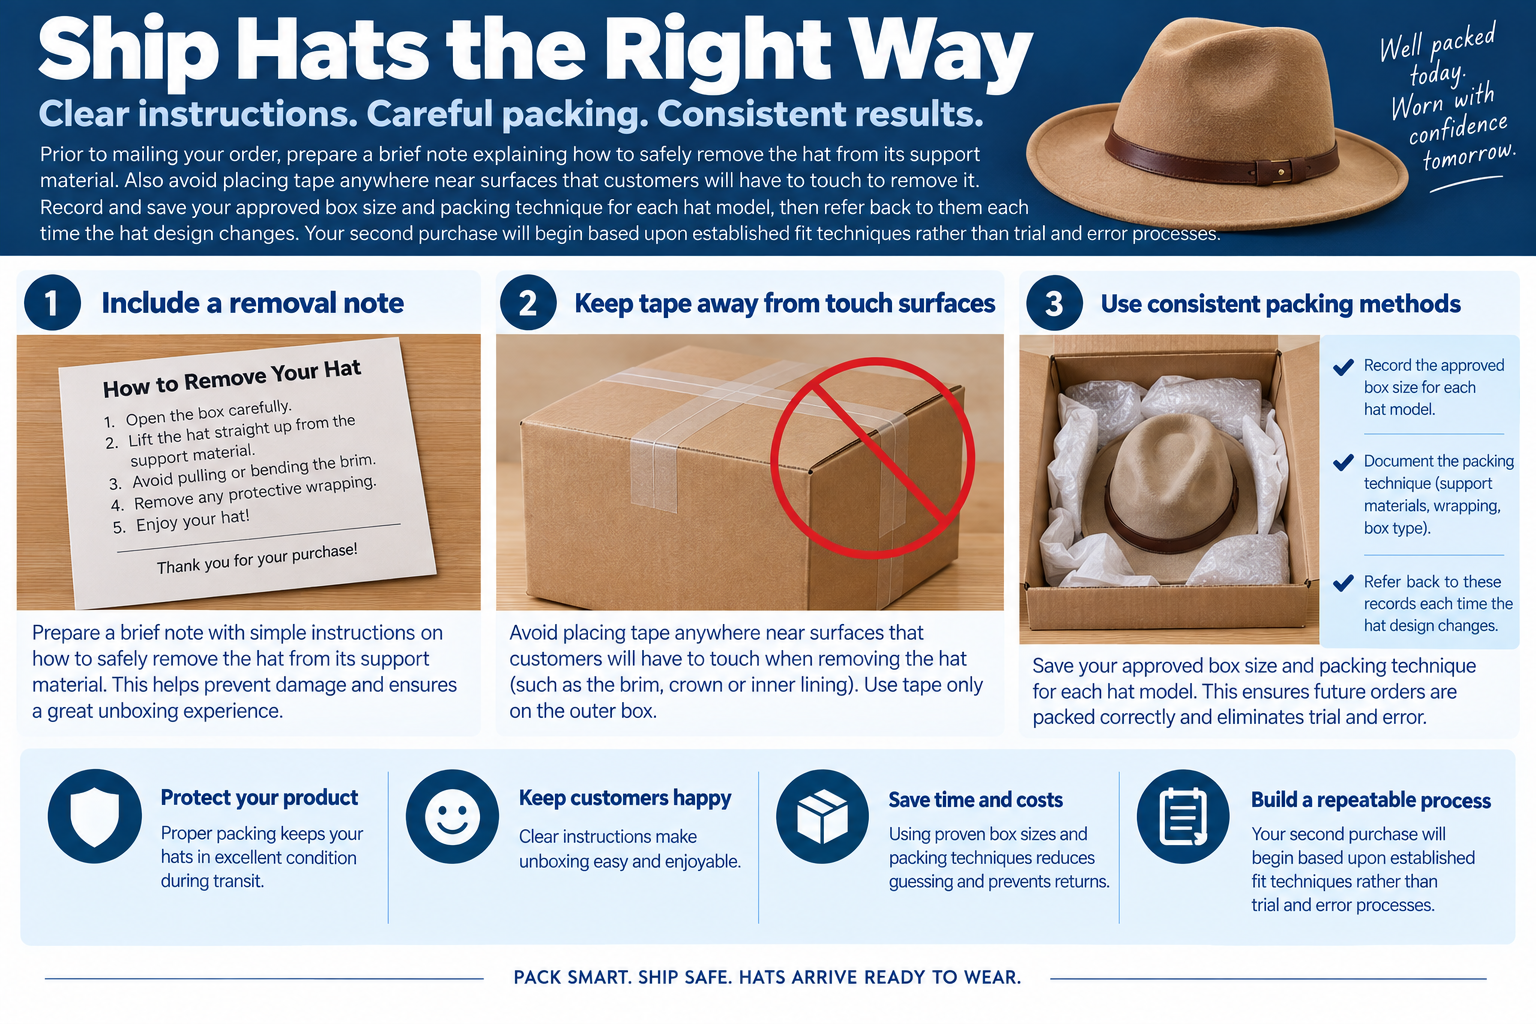
Prior to mailing your order, prepare a brief note explaining how to safely remove the hat from its support material. Also avoid placing tape anywhere near surfaces that customers will have to touch to remove it. Record and save your approved box size and packing technique for each hat model, then refer back to them each time the hat design changes. Your second purchase will begin based upon established fit techniques rather than trial and error processes.

Make Every Package Less Tempting

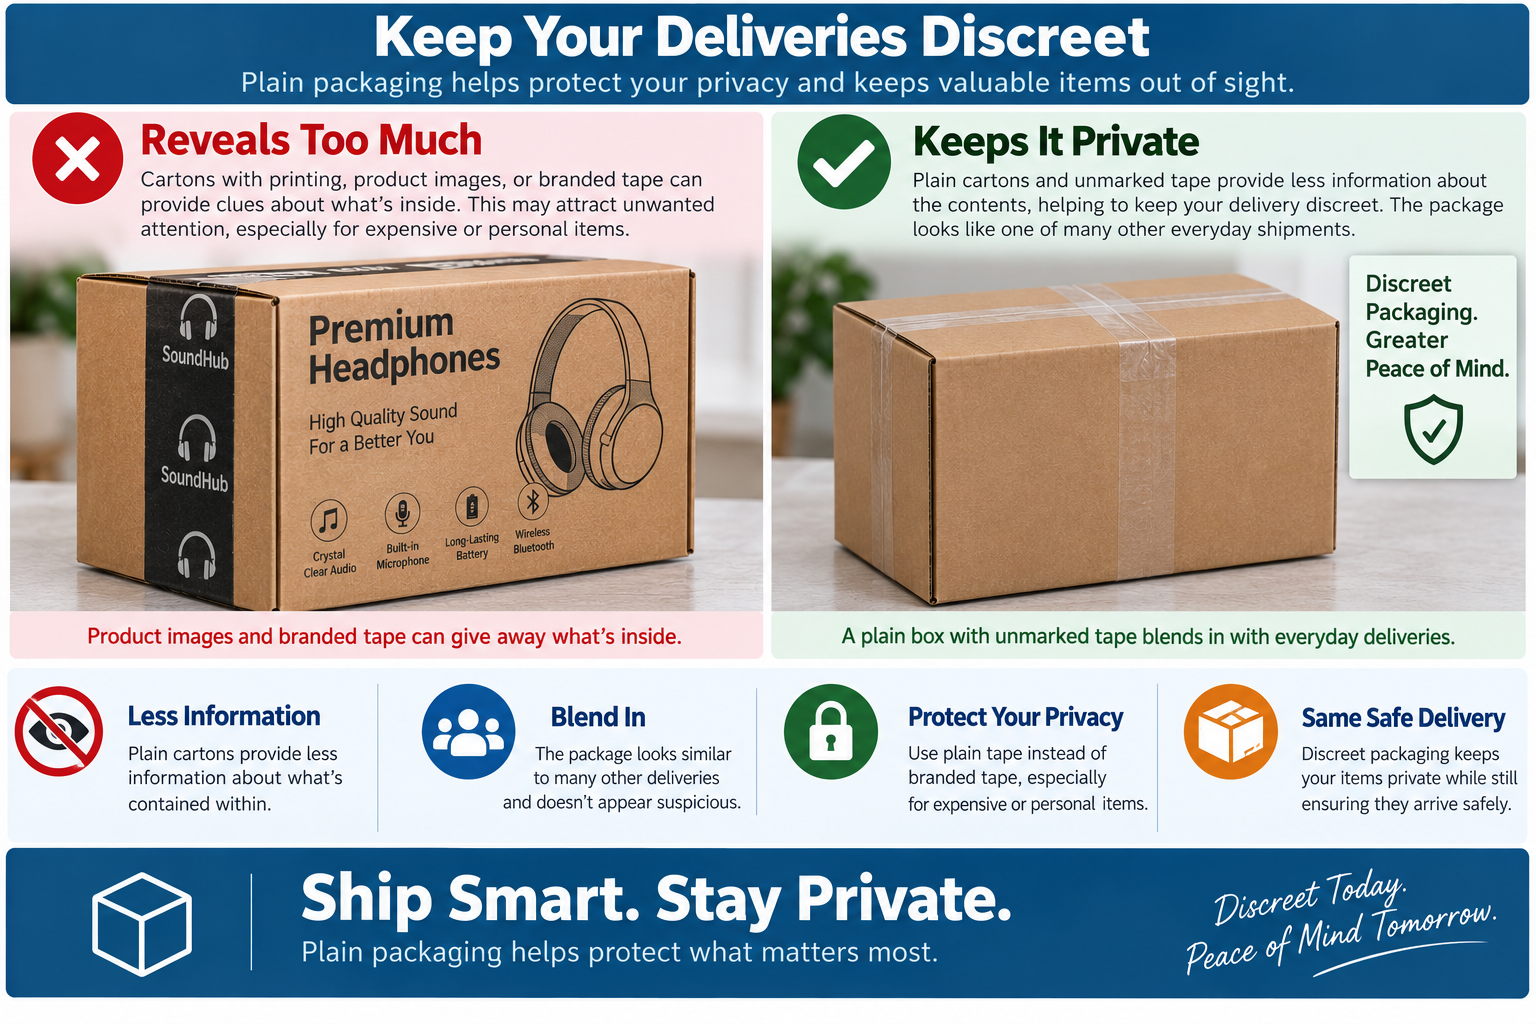
Plain cartons provide less information about what is contained within than cartons with printing or pictures of products. In addition, branded tape often provides additional clues regarding the contents of the package. Therefore, plain tape would likely be preferable for packages containing expensive or personal items. The aim is not to have the package appear suspicious; rather, it should appear similar to one of many other deliveries.

Care should be used when creating return labels
The return label must contain enough information to allow carriers to successfully deliver the package. However, there is no requirement that the label identify the product. A clear return label should lie flat and remain easily readable by scanners. Do not obscure your return labels with comments, stickers, etc. Or large print which may indicate what is contained within. Additionally, using a generic sender name may protect against privacy violations if a company delivers sensitive material, while adhering to all applicable carrier requirements.

Preventing opening
Secured shipping containers may also indicate that a thief attempted to open the container. Securely attach strong tape across both the center seam and both edge seams on both sides of the top and bottom. While securing a container may not prevent theft, torn or removed strips of tape may alert the recipient to potential tampering. Also, use strong tape to close any openings in the container instead of loose strips of tape which may become dislodged during typical transit and handling.

Continuing discretion inside the container
While a discreet exterior box does little to deter a determined thief, the discretion continues when selecting materials used inside the container. Include any inserts such as gift wrapping, notes, paper, or cards intended solely for the recipient’s benefit. Including these types of inserts maintain an atmosphere of discretion while allowing the recipient to still receive a personalized greeting from you.

The box is only one part of a complete delivery solution
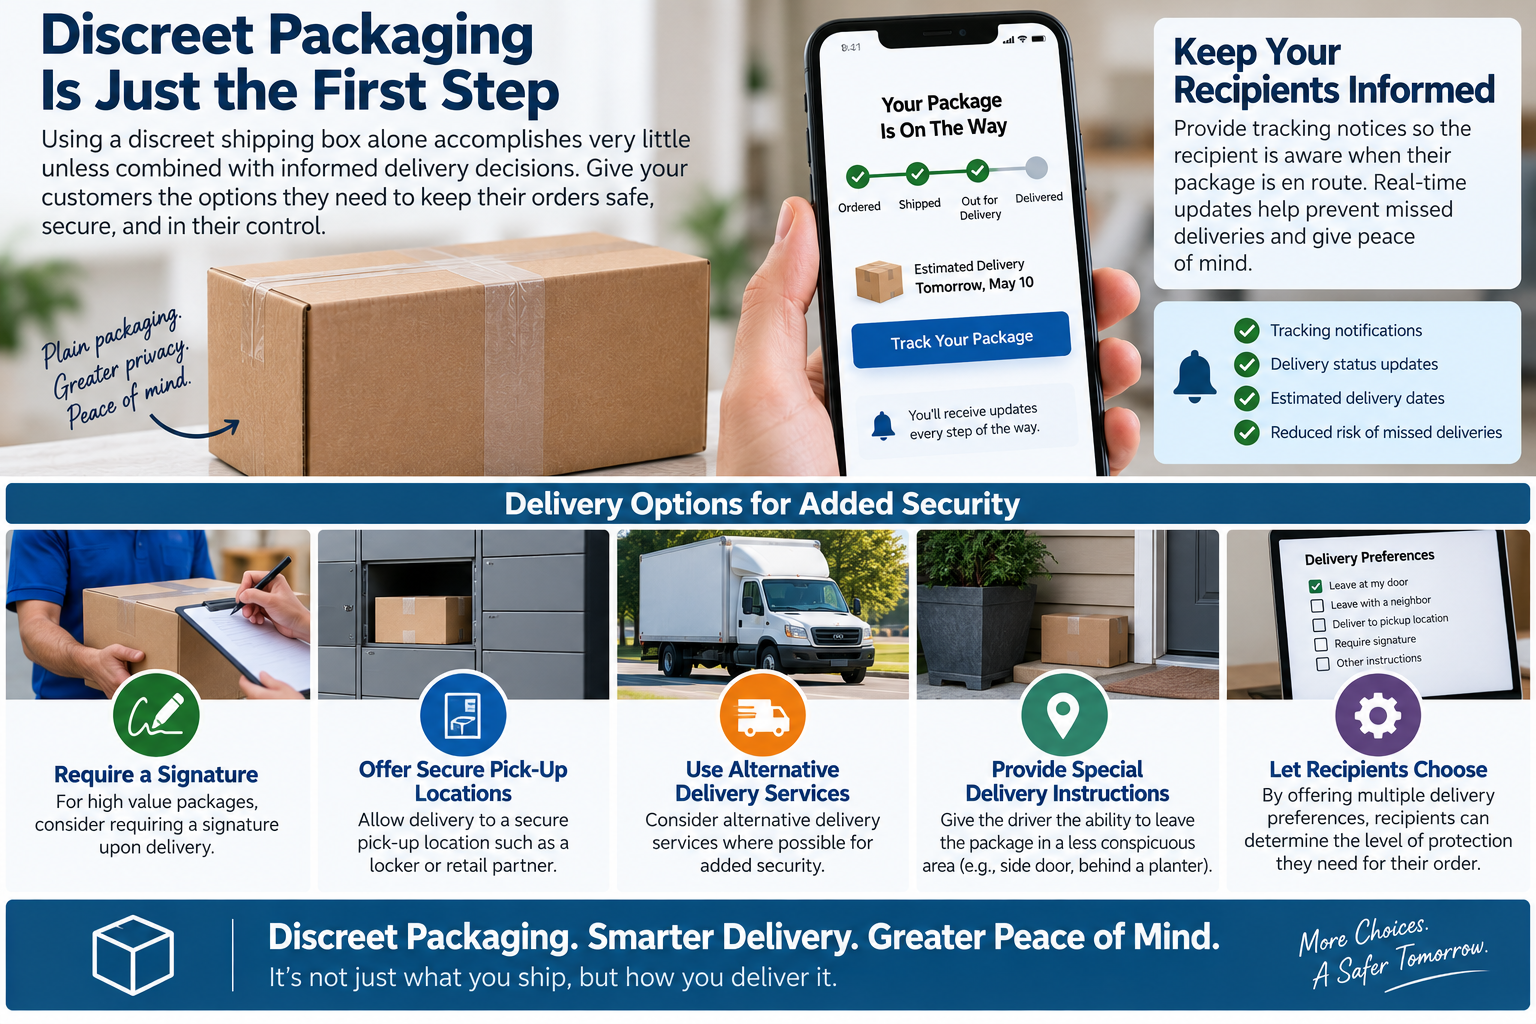
Using a discreet shipping box alone accomplishes very little unless combined with informed delivery decisions. Provide tracking notices so the recipient is aware when their package is en route. For high value packages, consider requiring a signature upon delivery, offering secure pick-up locations, or utilize alternative delivery services where possible. Consider providing the driver with the ability to leave the package in a less conspicuous area. By giving recipients multiple options related to their delivery preferences, they are able to determine what level of protection they require for their order.

Protecting privacy and preventing theft are two different problems but both can be solved with simple shipping options.
Simple shipping solutions can address issues related to protecting consumer privacy and preventing loss due to theft. Simple shipping solutions conceal information about the contents of a shipment reducing unwanted exposure. Providing simple shipping solutions allows consumers to receive shipments privately and quietly.

Only One strips of tape across top may not be sufficient

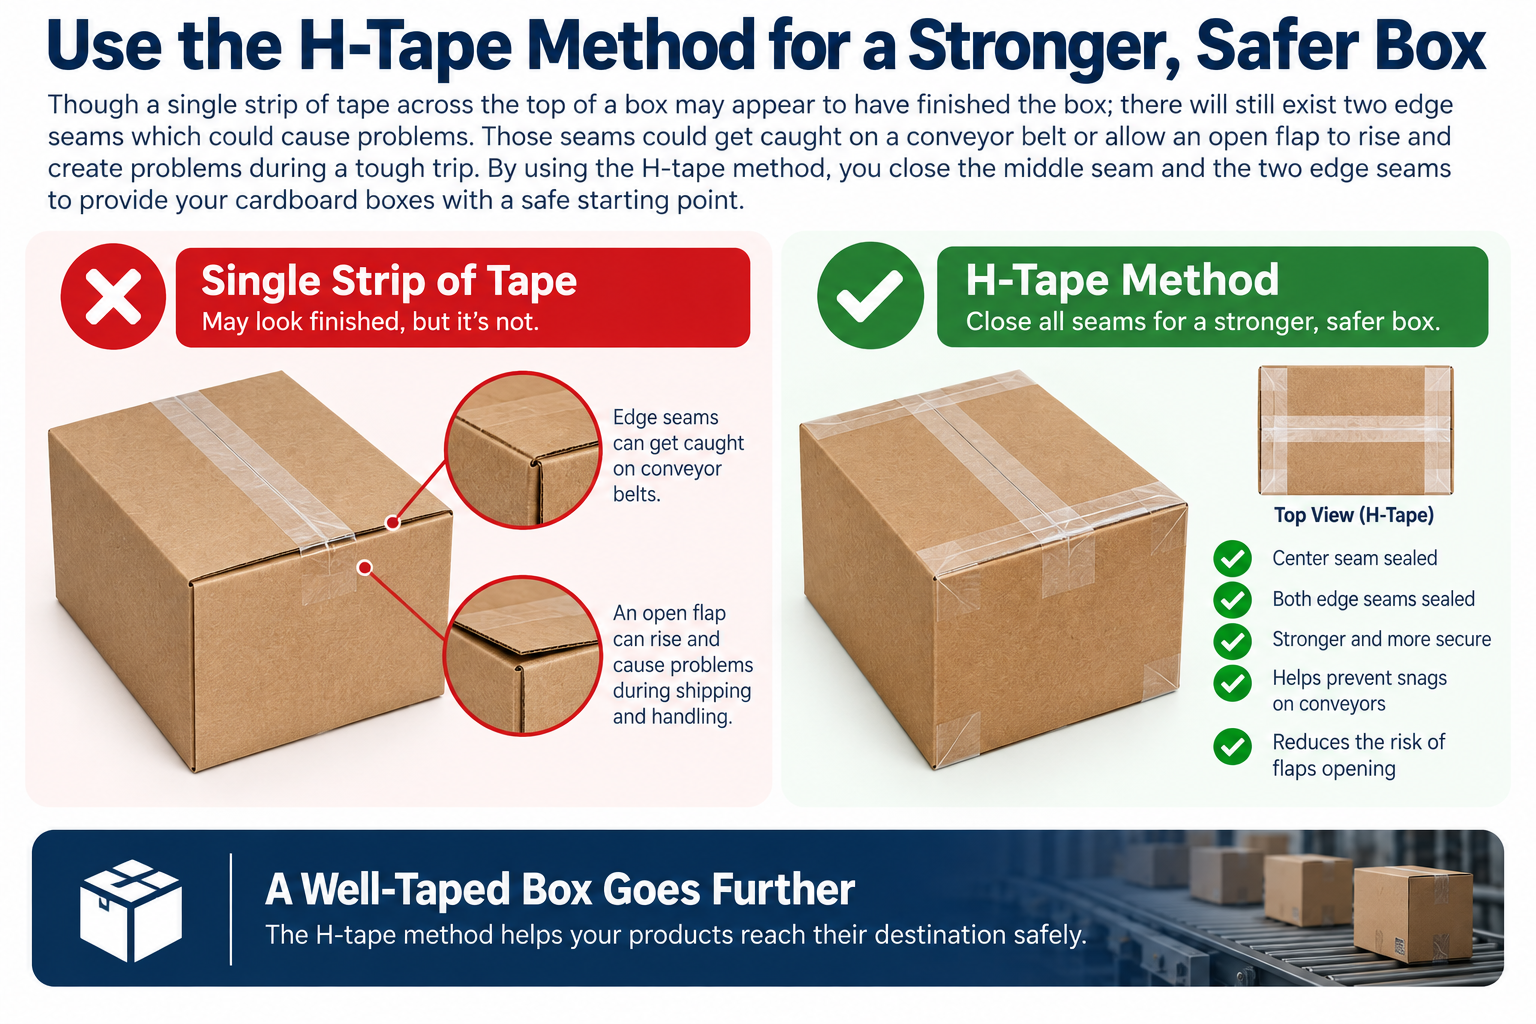
Though a single strip of tape across the top of a box may appear to have finished the box; there will still exist two edge seams which could cause problems. Specifically, those seams could get caught on a conveyor belt or allow an open flap to rise and create problems during a tough trip. By using the h-tape method, you close the middle seam and the two edge seams to provide your cardboard boxes with a safe starting point.

You want to use shipping tapes (clear packing tape, reinforced tape, etc.) not masking tape, thin office tape, string or twine. All of these types of tape can get caught in sorting machines by postal guidelines.

Your tape needs to be large enough to support both sides of a seam. Most major carriers require tape to be at least 2-inches wide. If you use a tape that is too small, it has less surface area to “grip” and therefore will most likely peel off soon. Additionally, if you put a lightweight carton with a heavyweight item inside, it creates added pressure on the closure.

first, fold the smaller flaps inward. Then bring the larger flaps together without weaving them together. Now run One strip of tape along the center seam of the flaps. Press the tape down onto the seam and continue running it over the ends until it covers the sides of the box.

Then take another piece of tape and cover the edge seams where the flaps meet the box. This second piece of tape runs perpendicular to the first strip of tape and forms an “h”. When you rub along the tape, it allows the adhesive to come into contact with all parts of the cardboard from end to end. Follow the same three-strip procedure once again after you close the top of the box.

Moisture, dust and cold temperatures can weaken the adhesive properties of the tape. Always keep your cardboard boxes dry and wipe any debris off of them prior to taping. Also avoid putting new tape on top of existing tape that is beginning to peel or is dirty. New tape sticks much better to clean cardboard than it does to older layers of tape that may lift off.

Using a tape gun makes application easier and quicker. However, you must always handle the blade and roller with extreme care. Make sure you set up enough pull on the gun so that the tape lays flat without being stretched excessively. Overpulling tape may eventually lift due to its own elasticity attempting to return back to its original state. Wrinkling can also leave some parts of the seam uncovered.

In many cases heavier items will require reinforced tape or additional strips according to the carrier’s instructions. Simply adding extra layers randomly is not an acceptable fix for crushed, wet or broken-down boxes. While tape can seal flaps, it cannot repair damaged cardboard that has lost its integrity. It would be best to replace weak boxes before relying on even more tape to try and salvage them.

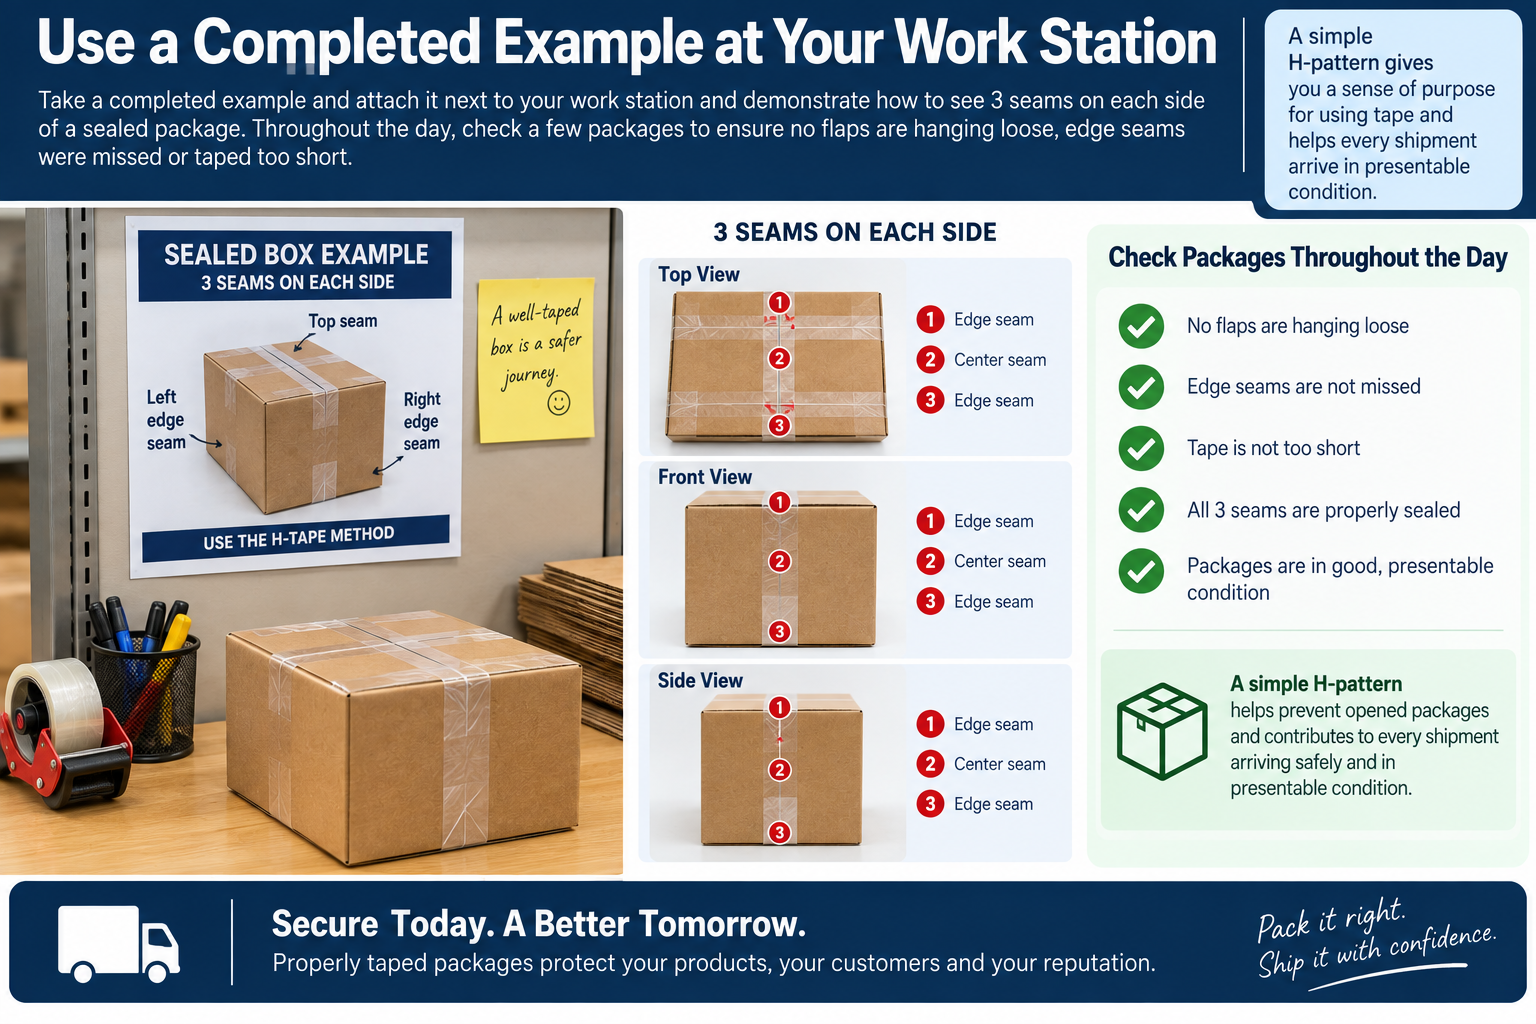
Take a completed example and attach it next to your work station and demonstrate how to see 3 seams on each side of a sealed package. As well, throughout the day check a few packages to ensure no flaps are hanging loose, edge seams were missed or was taped too short. Using a simple h-pattern gives you a sense of purpose for using tape, decreases opened packages and contributes to every shipment arriving in presentable condition.

Don’t Guess When Choosing Poly Bags

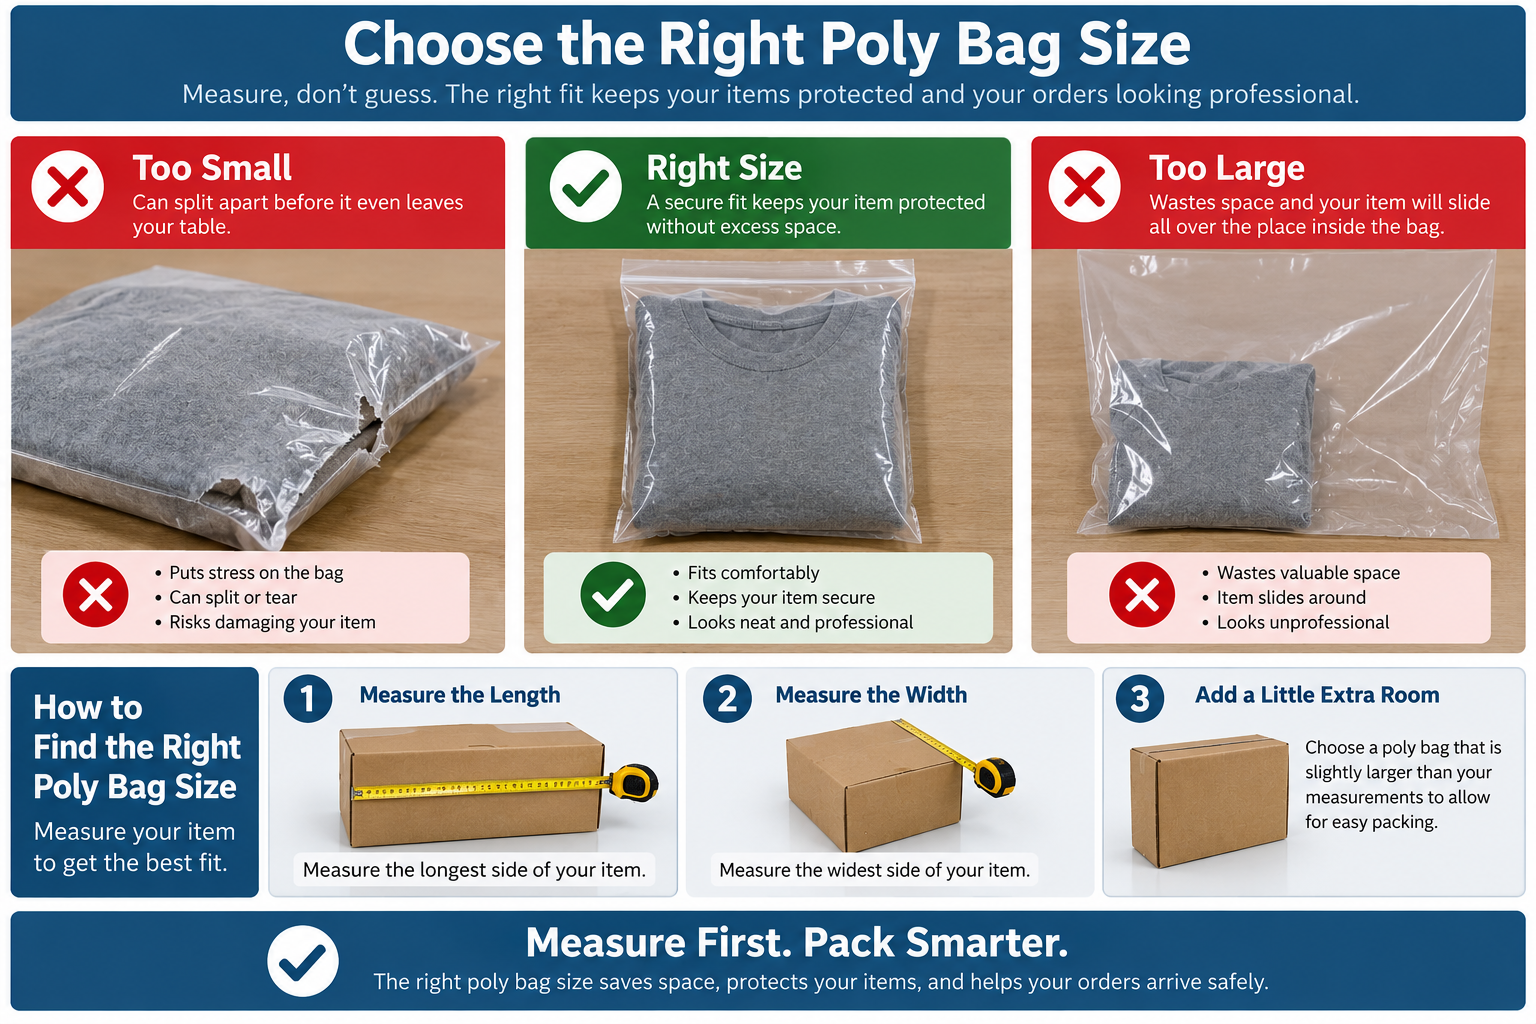
If you pack orders into poly bags that are too small, they could split apart before they even leave your table. On the other hand, if you over-size the bag then you’ve wasted valuable space and your item is probably going to slide all over the place inside the bag. To avoid these issues, begin by determining the correct poly bag for an item by measuring it rather than guessing. 

By doing a couple of quick measurements, you’ll likely be able to solve most of your common packaging problem issues. First take note of the length and the width of your item. Take the measurement across the widest point of your item. Be sure to give yourself some additional space so that you’re able to slip the product inside without forcing it. For example, a folded t-shirt would require enough space so that it does not stretch out the bag nor cause the edges of the bag to appear pulled together.

The same is true concerning the weight of your product. While the size of your product certainly affects your ability to determine the correct poly bag, it’s equally important to consider the weight of your product. In this case, you want to select a poly bag based upon its thickness (measured in mils). A smaller number indicates a thinner poly bag. Conversely, a larger number indicates a thicker poly bag. For lighter products such as greeting cards or fabrics, there may be no need for added support; however heavier objects such as tool or part with sharp edges may need increased support to ensure safe shipping practices.

As noted previously, the shape of your product will also affect which type of poly bag will work best for you. If you have a flat product, it’s probable that a basic open-ended poly bag will work perfectly. However, if you have a thicker product or one with extreme angles/edges, you may find that a poly bag that is wider and has additional side room is needed. To confirm that your product will fit properly within a new bag before purchasing a quantity of them, try fitting your product into a single sample. This will allow you to verify that your product does not pull against the seams of the new bag.

When selecting the type of closure for your poly bag, there are two main types available. There are those with a sealing tape or strip which will completely seal the bag closed and those that have a zipper that will allow you to open and close the bag multiple times. Once you have selected the type of closure you prefer, you must now think about how many times the person receiving the package may need to open and/or access the contents of the poly bag. For instance, if a customer receives a shirt packaged in a sealed poly bag but later needs to inspect the shirt prior to returning it back to you, then he/she will need to remove the entire contents of the poly bag including the shirt in order to do so.

If visibility is necessary to allow warehouse employees to easily count their inventory, then clear plastic is your answer. Additionally, since clear plastic allows for viewing, it eliminates the possibility of packing incorrect items and labeling errors. Adding a label containing the product description/name and/or order # provides further identification without obstructing employee views.

There are specific requirements when dealing with food items. Those poly bags designed for clothing/hardware are not created to come into direct contact with food. Therefore, anyone who plans on packing snacks, baked goods or other consumable items should first verify that the poly bag(s) they plan on utilizing meet the required food-grade specifications prior to use.

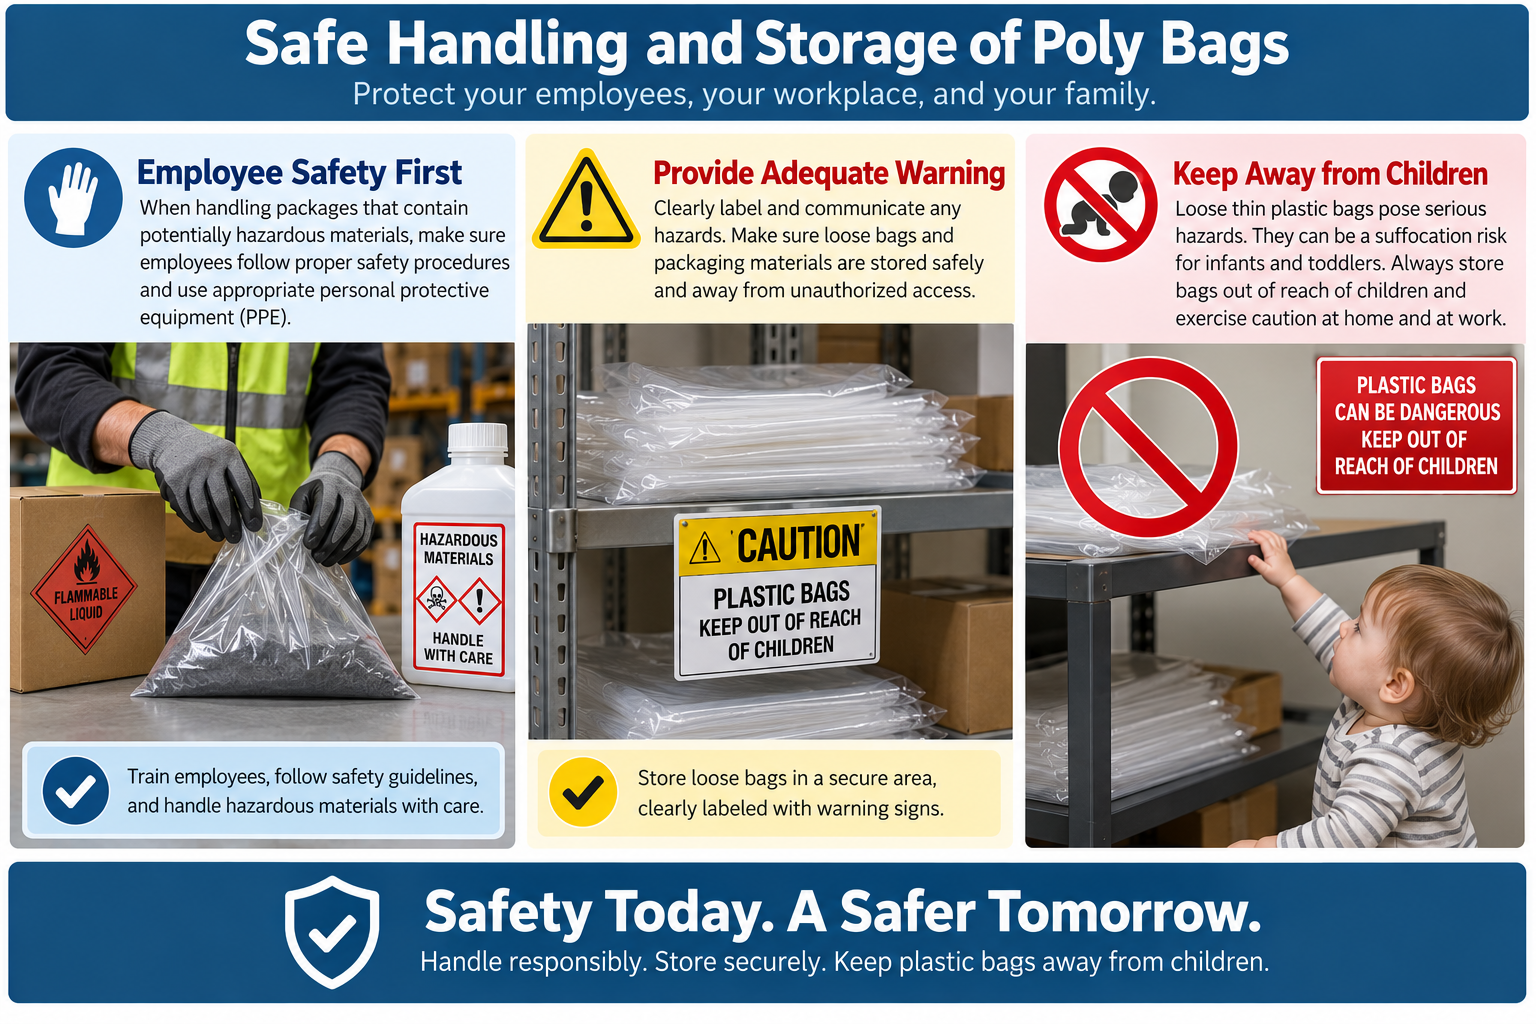
In addition to ensuring safety for employees handling packages with potentially hazardous materials contained therein, it is also very important to provide adequate warning and store loose bags safely where children cannot reach them. Loose thin plastic bags pose serious hazards and adults should exercise caution to keep them away from infants/toddlers.

Once you have taken these three key elements into consideration: measure first, match thickness to product and select a suitable closure method, choosing the right poly bags will become much simpler. Taking these three simple actions can reduce waste, improve efficiency during packaging processes and ultimately result in each item arriving at its destination in perfect condition.

Never Run Out Again

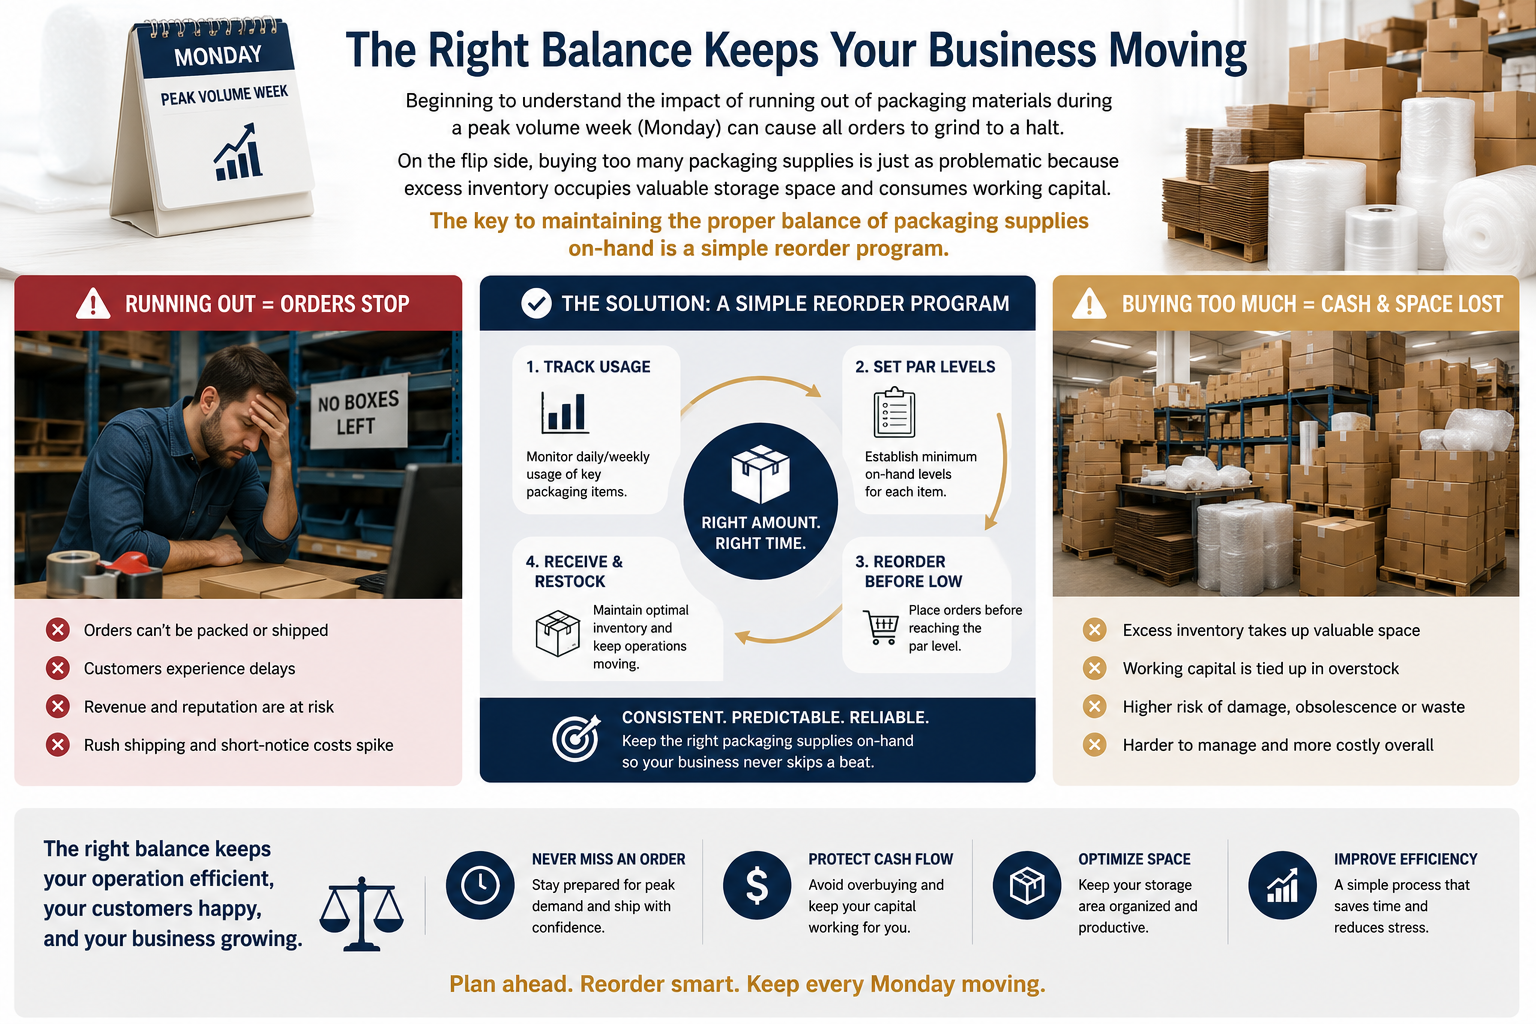
Beginning to understand the impact of running out of packaging materials during a peak volume week (Monday) can cause all orders to grind to a halt. On the flip side, buying too many packaging supplies is just as problematic because excess inventory occupies valuable storage space and consumes working capital. The key to maintaining the proper balance of packaging supplies on-hand is a simple reorder program.

Firstly, watch how your team uses packaging supplies for approximately 28 days. Document the quantity of each type of packaging material (boxes, tape rolls, labels, mailers, and packing paper) at both the beginning and ending of each week. Tracking usage like this provides insight into which packaging materials are being consumed rapidly and those that tend to linger on shelves. There is no reason to assume a high consumption rate based solely on your highest-volume day.

Secondly, determine your average daily consumption. If your team consumed 100 mailers during a 20-day period, your average consumption would be 5 mailers per day. Record this average along with the product name. Continue this process for each packaging supply whose depletion would severely impede operations.

Thirdly, calculate the lead-time for receiving new orders. In most cases, reviewing past deliveries is a good indicator of the typical lead-time associated with purchasing through a particular vendor. For example, if most recent orders have taken an average of 4 days to arrive, consider using this value as part of your reorder program.

Fourthly, multiply the daily usage value by the number of delivery days (lead-time). Using our previous examples, if a company has an average daily usage of 5 mailers and experiences a 4-day lead-time for ordering new supplies, they would require a minimum of 20 additional mailers until their next shipment arrives. As an added measure of protection against unexpected increases in demand due to unusual events such as inclement weather, last-minute promotions or delayed shipments, add a small buffer to the total.

The resulting number represents the maximum allowable quantity on-hand prior to placing another order. Labeling the exact level with a brightly colored marker placed directly on the shelving unit where the packaging supplies are stored is an effective way to visually communicate when to restock. Alternatively, documenting the required reorder point on a clipboard is a low-cost alternative solution to utilizing expensive software programs.

Lastly, give consideration to the few packaging supplies that are utilized in virtually every order. These include but are not limited to; standard size shipping boxes, roll tape and shipping labels. Due to the frequency of use and critical nature of these packaging supplies, it is recommended that you maintain higher levels of inventory stockpiled for immediate availability. Maintaining sufficient backup stock of frequently used packaging supplies will help ensure uninterrupted production and minimize costs spent on unnecessary purchases for products and services that provide greater economic benefits.

When evaluating your current inventory management strategy, also take into account factors related to available storage space. Shipping boxes flat require adequate ventilation to prevent moisture buildup, roll tape requires storage in areas protected from excessive heat exposure and shipping labels must remain clean and unsoiled.

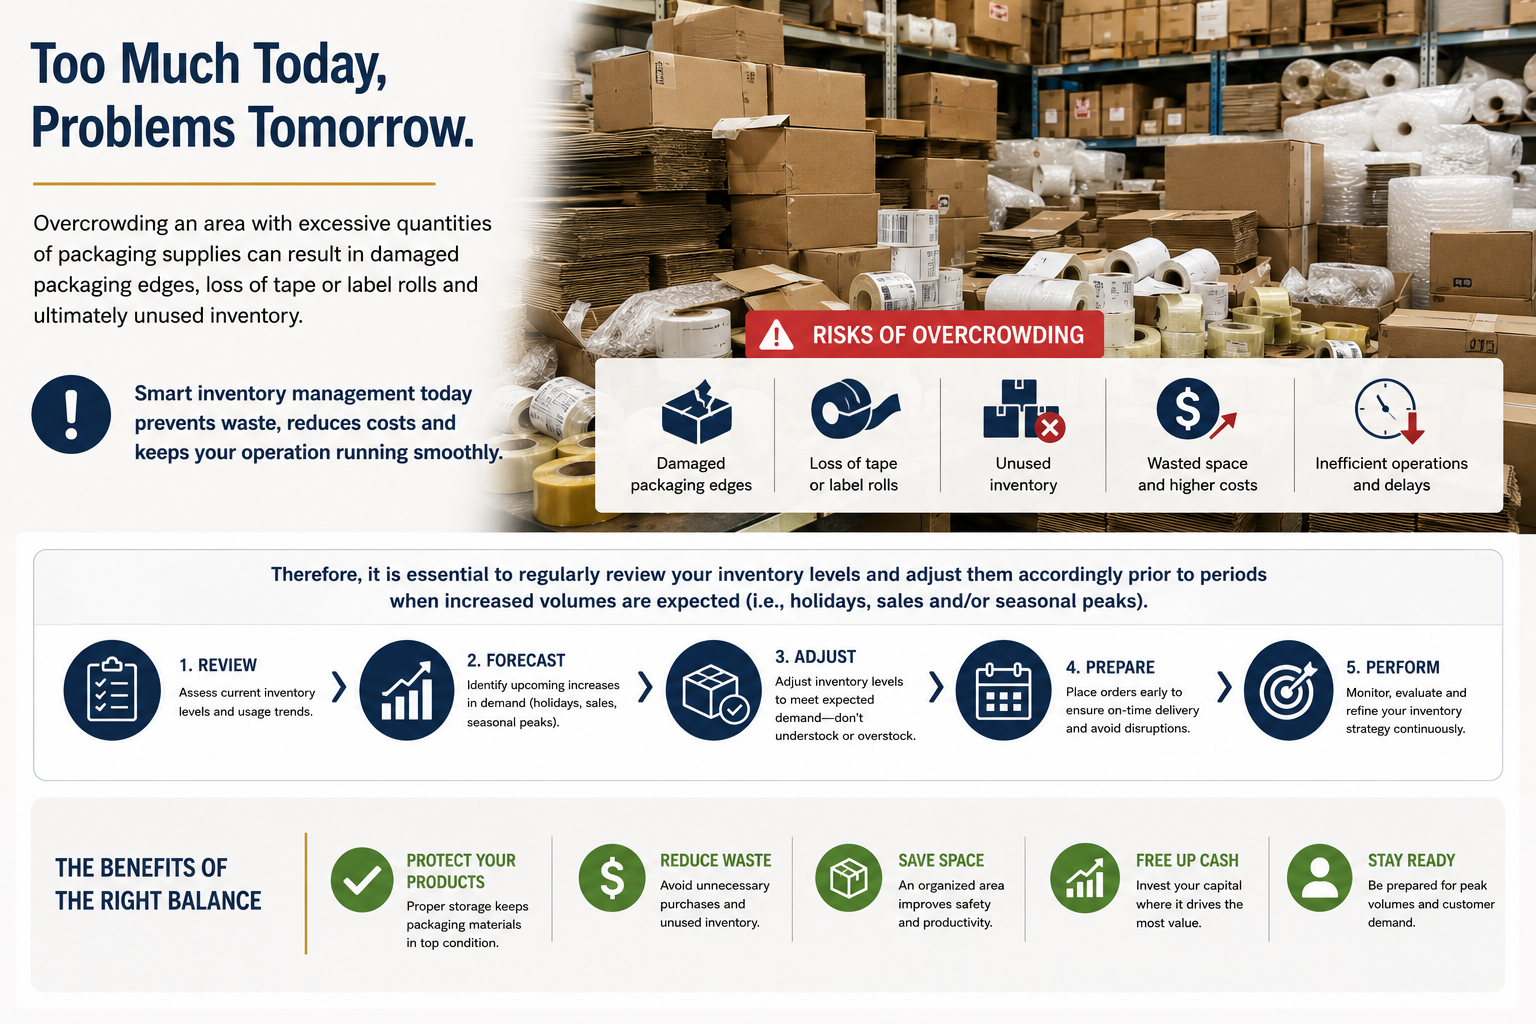
Overcrowding an area with excessive quantities of packaging supplies can result in damaged packaging edges, loss of tape or label rolls and ultimately unused inventory. Therefore, it is essential to regularly review your inventory levels and adjust them accordingly prior to periods when increased volumes are expected (i.e., holidays, sales and/or seasonal peaks).

A simple weekly inventory check allows you to make adjustments prior to potential problems turning into operational disruptions.

Can Poly Bags Hold Electronics?

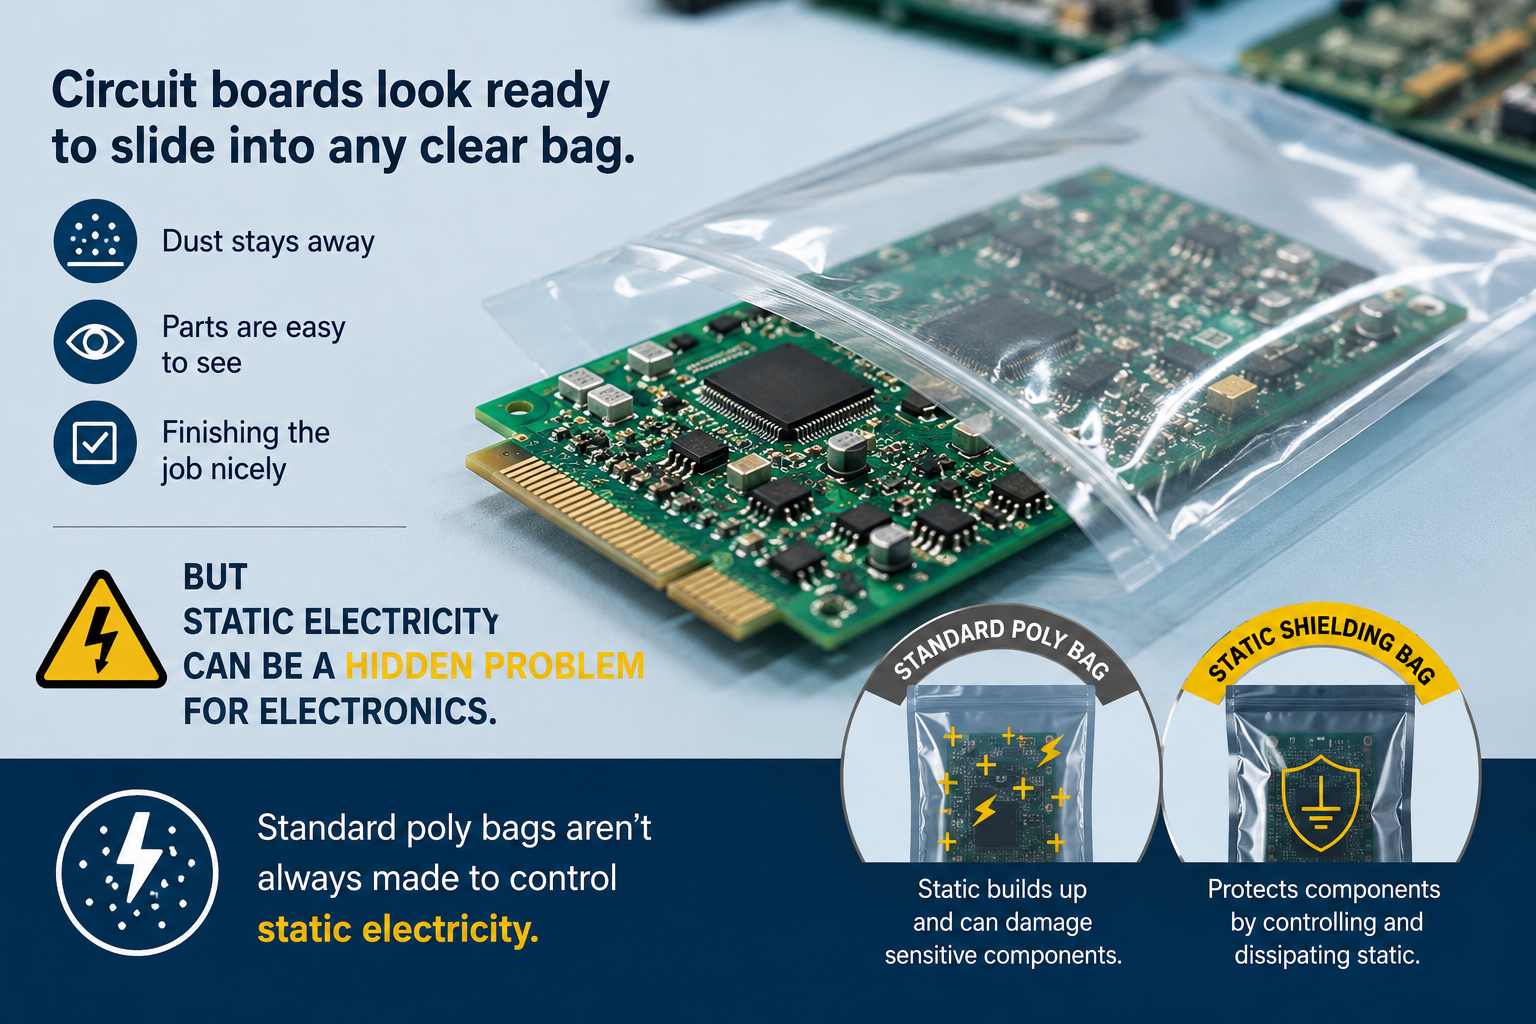
Circuit boards look ready to slide into any clear bag. Dust stays away and parts are easy to see, finishing the job nicely. But static electricity can be a hidden problem for electronics. Standard poly bags aren’t always made to control static electricity. 

So neat appearance doesn’t mean they are safe for every electronic part. Static electricity is an electric charge that builds when materials separate and touch. We know it as that snap after walking on carpets. Sensitive chips might react to very small events and damage might not leave burn marks or broken parts. Sometimes the part fails right away; other times the damage shows up after use.

Start out by checking if an item is marked sensitive to electrostatic discharge (ESD). Don’t judge packaging quality by price or size. Cheap items can require special care too. If unsure, consult the lead person at the company who deals with ESD or a packaging supplier before selecting bags. 

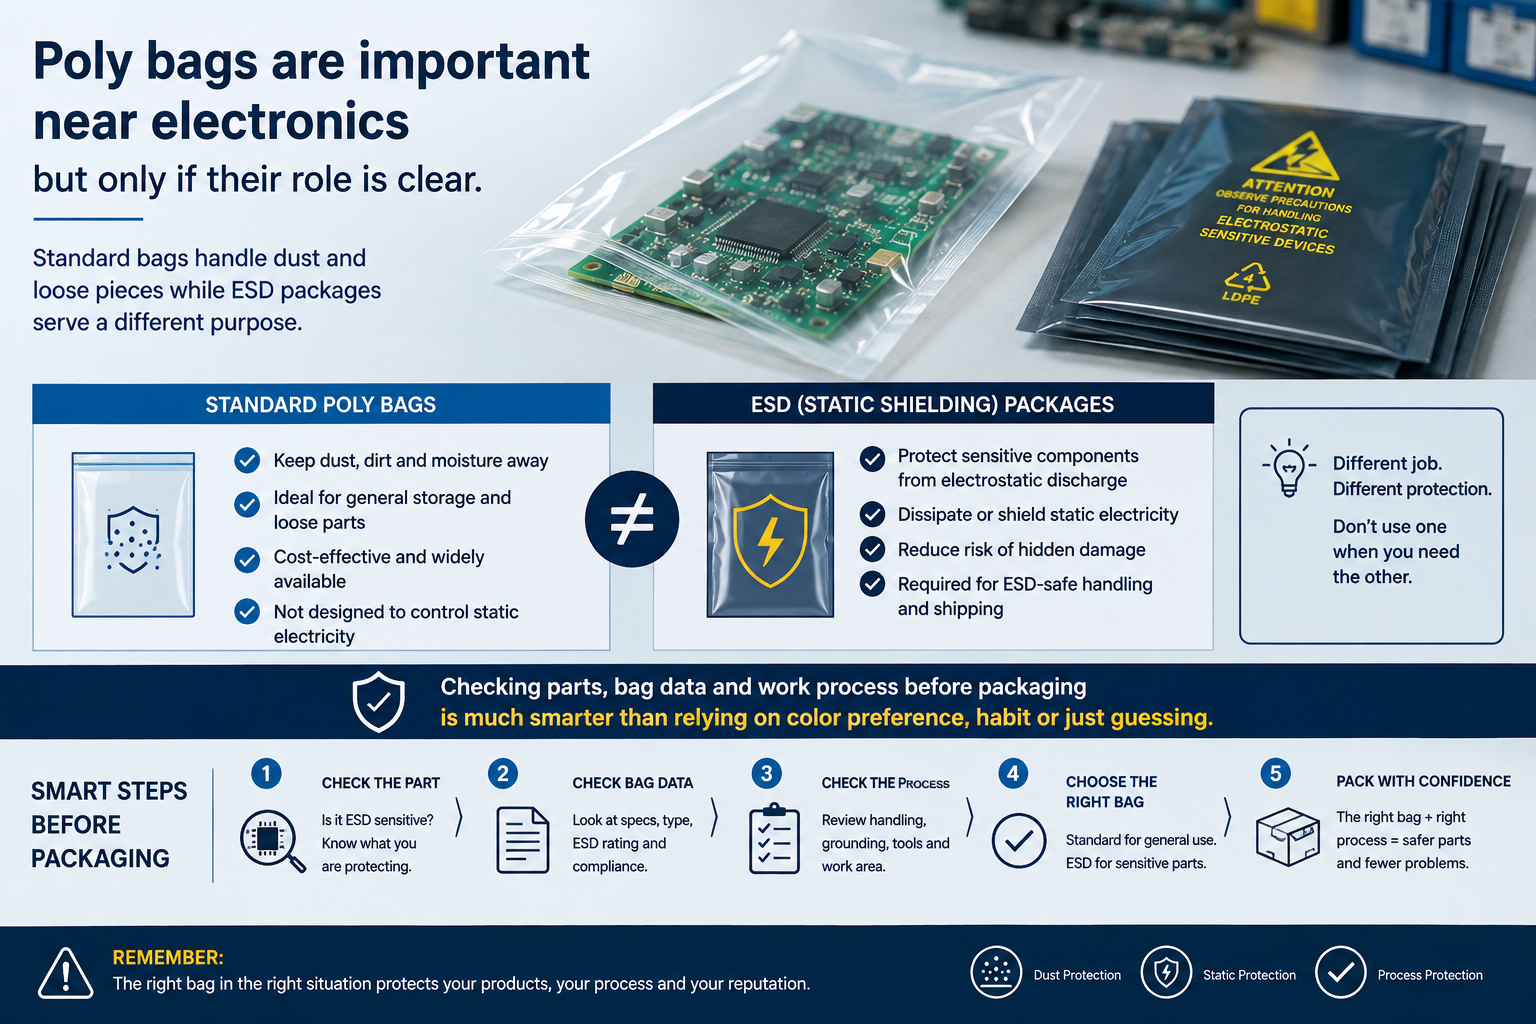
Ordinary clear poly bags work well for cords, cases and manuals and many other items. But they should not be considered ESD packaging unless results of tests and intended use match job. Color alone is not sufficient proof; a pink, gray or silver bag might serve a different purpose from another bag that has the same shade.

ESD bags serve different purposes. Some bags limit charge that results from contact and movement. Other bags add shielding that protects items from external electric fields. Tasks are different. Plastic bags can reduce charge but lack shielding so you need to name ahead what level of protection you need. 

Packaging matters along with the bag. Parts that are sensitive should enter the package inside approved work areas following company ESD plans. Workers need steps, grounded tools, right surfaces and approved clothing. Putting a special bag on a table that is unsafe does not turn that station into a secure space.

Inspect bags before use. Things like holes, broken seals, worn folds, or damage to metal layers can affect how they perform. Follow rules for closing, labeling storage and reuse set by bag makers. If contents cannot be seen mark outside so workers can identify parts without opening and exposing them. 

Poly bags are important near electronics but only if their role is clear. Standard bags handle dust and loose pieces while ESD packages serve a different purpose. Checking parts, bag data and work process before packaging is much smarter than relying on color preference, habit or just guessing.

What happens when the buyer opens your package?

Most people think about protecting their order – they don’t think about the box. Most people expect to be able to open their box at home. The right packaging supplies will help keep the product safe while making it easier for the customer to open the package.

The first step is to start with the outside of the box or mailer. Consider using a large flap that can be easily picked up and used to open the box. Or use a pull tab on top. Or use a tear strip that is easy to see and pick up. A small tab may be difficult for some buyers (i.e. older adults) or those who have sore hands to hold onto. Thick plastic wrap is very hard to cut. If there are other options available, a paper mailing box or mailer which has a clear opening point would be better choices for products.

When talking about tape, many people don’t realize how important it really is. A single clean strip over the seam in a box may provide more strength than several loose strips placed all around. Too much tape may make a box into a locked chest. Just enough to keep the item closed — leave room for the buyer to begin opening the box. Labels such as “open here” or arrows to guide them through this process, save the buyer from guessing.

Also consider the items inside the package. Avoid hiding anything under layers of filler. Fold any paper wrapping so the end where opening can take place does not rip everything apart. Bags should also have either a flap or edge that can be found by fingers. Instead of putting many pieces of small parts in tight layers, put them in one clear pouch. These choices will also help prevent losing parts during opening.

Labels on packages must also be clear. Use large print, plain terms & strong contrast between label color/color and background color. If the package needs to remain upright during shipping, let the buyer know where they will find this information. Bills, return papers & care notes should always go near the top of each package. A person should never need to empty out the entire box before learning how to open it.

Do a test run on each type of package before shipping orders. Simply set a box on a table and try to open it using only one hand. Do another test wearing gloves. Determine whether you can easily find the tab and if you needed sharp tools to complete any part of the process. If safety rules require certain packaging (such as child-safe packaging, sealed medical packaging), follow those rules first.

Using easy-opening packaging helps many more people than most may understand. It could help someone with arthritis, a parent holding a child, or a worker who has to open hundreds of boxes daily. Using easy-opening packaging could also lower the chance of an order being damaged because it had to be cut open with a knife. Good packaging supplies should protect what’s inside without making the buyer fight to get to it.